Driving Guide
More actions

Introduction
Driving is an essential operation of every railway network. In Dovedale, a variety of trains and routes are provided to players, with no experience required. This guide provides you with everything you need to know about driving in Dovedale. It is highly recommended that you read the Signals, Signs and Headcodes pages before reading this guide to best understand driving procedures and regulations.
Getting Started
| 1.1 - Spawning Trains |
|---|
|
Trains can be spawned by clicking on spawners located on the tracks in certain locations across the map. Spawners can only be used if the spawning zone is clear of trains. The locations of train spawners can be found on the List of Trains page, and in the spawn menu. Spawners are labelled with their train class and livery. Some spawners are group locked to Companies. |
| 1.2 - Driving UI | ||||||||||||||||||||||||||||||||||||||||||||||||||||||
|---|---|---|---|---|---|---|---|---|---|---|---|---|---|---|---|---|---|---|---|---|---|---|---|---|---|---|---|---|---|---|---|---|---|---|---|---|---|---|---|---|---|---|---|---|---|---|---|---|---|---|---|---|---|---|
|
The driving UI can be found at the bottom left of the screen when seated in a train. It provides important information to the driver about the status of the train and acts as a control panel for operating many features of the train. Below is a labelled image of the HUD with each section explained. 
|
| 1.3 - Route selection UI | ||||||||||||
|---|---|---|---|---|---|---|---|---|---|---|---|---|
|
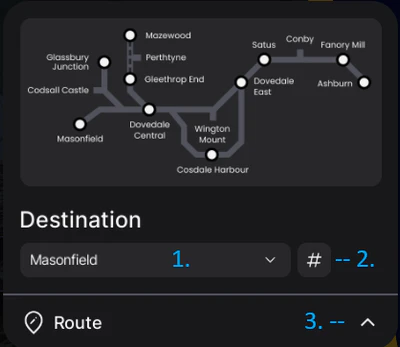
The route selection UI can be found above the main driving UI when in a train. With this UI you can select your destination and train type (1 - Express, 2 - Passenger, 5 - Empty Coaching Stock) which will be combined into your Headcode. Your headcode is unique to your train and will be displayed next to your name in chat, and to signallers. Below is the image of the route selection HUD.
 |
| 1.4 - Controls |
|---|
|
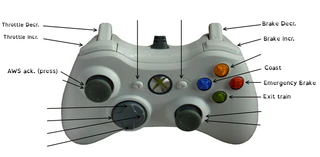
Primary driving controls (throttle, braking, and AWS) operate differently across platforms, but due to their importance they are easily accessible to all users. All other controls can be controlled via the HUD as described above. PCFor PC users, a list of all keybinds including primary and secondary driving controls can be found here. MobileUpon entering a train, mobile users will see large arrows appear on the sides of the screen, which can be used to control throttle and braking power. AWS is acknowledged by pressing the AWS sunflower on the driving HUD. ConsoleControls are linked to the Xbox controller as shown in the diagram below:  |
| 1.5 - Automatic Warning System (AWS) |
|---|
|
The Automatic Warning System (AWS) is a system used to inform the driver of whether the next signal they are approaching is at proceed or at caution/danger, or of a significant speed reduction. Depending on the upcoming signal state, the AWS will either produce a 'beep' sound (as a warning indication), or a 'bell' sound (as a clear indication). If the train driver fails to acknowledge a warning indication, an emergency brake application is initiated by the AWS, and it can't be reduced until the driver acknowledges the warning. |
Driving Regulations
| 2.1 - Performing Movements |
|---|
| 2.2 - Spawning & Commencing Service |
|---|
|
WIP |
| 2.3 - Stopping at Stations | |||||
|---|---|---|---|---|---|
|
Stations are the most important locations for passenger trains, where drivers must stop and allow for the safe boarding of passengers. Below are procedures which should be followed when arriving or departing at stations. Arriving at a Station
If there are "Reverse" or "T" stop markers, you should stop at them only if you are terminating. 3. Once stopped, open your doors for the correct side. You should keep your doors open until your platform signal has been cleared. However, if your train is terminating and going out of service, you should close the doors shortly after arriving.
|
| 2.4 - Appointing a Guard |
|---|
|
Planned for future updates.. |
| 2.5 - Shunting |
|---|
|
Shunting is the process of making short, low speed movements to move a train between different lines, platforms etc. Shunting is usually done outside of normal service, often required before commencing service or after finishing a route to move a train to the correct platform before departing. Shunting Procedure
Notes for shunting
|
| 2.6 - Coupling |
|---|
|
Coupling allows multiple units to be connected and operated together. A guide to coupling trains can be found here. |
| 2.7 - Electric Token Block Sections |
|---|
|
Some sections of the network are signalled under the Electric Token Block regulations. These sections are marked by signs at the start and end of token working. Under these regulations, drivers must be in possession of an occupation token to proceed on a single line. Entering a token working section
Exiting a token working section
|
| 2.8 - Permissive Working |
|---|
|
Permissive Working allows trains to be signalled into signal blocks already occupied by another vehicle. A signal block is a section of track between two stop signals, or between a stop signal and a dead-end/buffer. Permissive working is primarily used to allow coupling or platform sharing. If permissive working is required, you should follow the procedures below: If a subsidiary signal is provided:
If no subsidiary signal is provided:
Platform Sharing If permissive working is being used for platform sharing, you should follow the instructions below:
|
Contingency Procedures
| 3.1 - Incorrect Train Routing |
|---|
|
If for any reason your train has been routed incorrectly such that you cannot reach your set destination, you must stop and contact the signaller of the controlling area. They must then set the correct route. If for example you have been routed to the wrong platform, you may be required to shunt to return to the correct line. |
| 3.2 - Passing Signals at Danger |
|---|
|
In some situations it may be necessary to pass a signal at danger to make a non-standard movement. If this is to be done, you must reach a clear understanding with the signaller as to what move will occur. The signaller will tell you:
You must then await verbal authority to proceed from the signaller, or a yellow hand signal. |
| 3.3 - Passing Unsafe Level Crossings |
|---|
|
If you approach a level crossing and determine that it is unsafe (barriers raised, obstruction on crossing, red crossing repeater etc.) then you must stop your train before the crossing and follow the procedure below: If a level crossing repeater is provided:
|
| 3.4 - Pilot Working |
|---|
|
WIP |
Emergency Procedures
| 4.1 - Signal Passed at Danger (SPAD) |
|---|
|
Signal Passed at Danger (Abbreviated to SPAD) means that a driver has passed a signal displaying a danger indication without authority. Doing so could lead to a severe incident, possibly involving a derailment or collision. As such, the occurence of a SPAD should be treated seriously and acted upon immediately. If you pass a signal at danger without authority, you must:
SPAD is considered an in-game offence and players may be moderated if they SPAD deliberately or consistently. |
| 4.2 - Derailment or Collision |
|---|
|
In the event of a derailment, you must stop your train immediately. You should despawn your train manually if you can. Derailments can be caused by speeding, SPADing resulting in running into unset points, signallers changing points beneath trains, or occasionally due to bugs. If you believe you have been derailed due to the actions of a signaller, you should try and resolve the situation in a civil manner. If for whatever reason a collision between two vehicles is about to occur, you must stop your train immediately. If a collision does occur, you should try to reverse the trains apart if they are not derailed, otherwise they must be despawned. You should consult with the other driver and the signaller to determine who is at fault for the collision. If the collision was caused intentionally or a driver refuses to remove a derailed train, you should call an admin for assistance. |
| 4.3 - Adverse Change Of Aspect (ACOA) |
|---|
|
If a signaller replaces a signal to danger without prior warning to the driver before a train has fully passed it, this is known as an Adverse Change Of Aspect (ACOA). This may occur if the signaller needs to stop a train in an emergency, or by accident such as believing a train has fully cleared a signal when it hasn't, or accidentally moving a lever. In this situation, you should stop your train immediately and contact the signaller to determine whether you should proceed. |
Additional Network Information
Below is a list of special information for different areas of the network, which may assist you whilst driving.
WIP