
More actions
m add navplate |
TheChris2009 (talk | contribs) Added points indicators Tag: 2017 source edit |
||
| (18 intermediate revisions by 5 users not shown) | |||
| Line 1: | Line 1: | ||
A '''signal''' is a tool that displays an indication of the track status ahead for drivers. There are several types of signals listed below that can be found in game. | A '''signal''' is a tool that displays an indication of the track status ahead for drivers. There are several types of signals listed below that can be found in game. Refer to the [[Signalling Guide]] to learn how to operate signal boxes. | ||
==Semaphore Stop Signal== | ==Signal Mechanisms== | ||
Railway signals take many shapes and forms. Dovedale Railway uses the standard semaphore signal. | |||
====Semaphore Signal==== | |||
A semaphore signal is comprised of a rotating semaphore arm mounted at the top of a post or gantry, and a light behind a set of lenses which move with the arm. When a semaphore arm is in the horizontal position, it is referred to as being 'on'. When it is raised or lowered by 45 degrees, it is referred to as being 'off'. Signals that raise when off are known as upper quadrant signals, and those that lower are known as lower quadrant signals. | |||
====Colour Light Signal==== | |||
Colour light signals utilise much brighter lights than semaphores, allowing the signal aspect to be seen clearly during the day without need for a physically moving signal. The lack of mechanical operation meant that colour lights were easier to maintain, more reliable, and often a similar price to installing new semaphores. | |||
Colour light signals consist of multiple lights stacked vertically in a housing. Since more than two indications are possible per signal, one colour light signal could often replace a pair of stop and distant semaphore signals. | |||
<br> | |||
==Stop Signal== | |||
<!-- [[File:Signal Home Semaphore R & G.svg|right|120px]] !--> | <!-- [[File:Signal Home Semaphore R & G.svg|right|120px]] !--> | ||
Stop signals are the simplest type of signal, informing a driver if they have authority to proceed past the signal. The clearance of a stop signal proves to a driver that the route ahead is clear of an obstruction. | |||
[[File:Semaphore Signal Clear.webp|right|100px]] | [[File:Semaphore Signal Clear.webp|right|100px]] | ||
When cleared, | '''When cleared, stop signals:''' | ||
* | * Allow the driver to proceed past the signal until the next stop signal reached. | ||
* Are raised or lowered at a 45 degree angle. | * Are raised or lowered at a 45 degree angle. (Semaphore) | ||
* Display a green light. | * Display a green light. | ||
[[File:Semaphore Signal Danger.webp|right|100px]] | [[File:Semaphore Signal Danger.webp|right|100px]] | ||
When at danger, | '''When at danger, stop signals:''' | ||
* Do not allow the driver to pass the signal. | * Do not allow the driver to pass the signal. | ||
* Are horizontal; at a 90 degree angle. | * Are horizontal; at a 90 degree angle. (Semaphore) | ||
* Display a red light. | * Display a red light. | ||
All controlled stop signals have a nameplate mounted to their post or gantry labelled with the code of the signal box controlling the signal and the corresponding signal and lever number for that box. When mounted alongside other signals, only one label may be provided. | |||
== | Most semaphore stop signals are provided with a white diamond sign on the post. These indicate that the presence of a train is repeated in the signal box, and drivers do not need to notify the signaller if they are waiting at it. | ||
=== Stop Boards === | |||
[[File:Stop Board.png|frameless|150px|right]] | |||
In certain situations such as uncontrolled stations or token working which require additional actions by the driver before departing, a stop board is installed instead of a signal, comprising a red circle on a white board reading '''"Stop"'''. A stop board should be treated as a stop signal at danger, meaning a driver must always come to a complete stop at the board. Once stopped, the driver must follow all instructions written on the board before proceeding. | |||
<br> | |||
==Distant Signal== | |||
<!-- [[File:Signal Distant Semaphore Y & G.svg|right|120px]] !--> | <!-- [[File:Signal Distant Semaphore Y & G.svg|right|120px]] !--> | ||
Distant signals provide advanced warnings as to whether the next stop signals will be at danger or not. This is necessary due to the long | Distant signals provide advanced warnings as to whether the next stop signals will be at danger or not. This is necessary due to the long braking distance of trains. | ||
If the signal is at caution, you must slow down, expecting the next stop signal to be at danger. | If the signal is at caution, you must slow down, expecting the next stop signal to be at danger. The indication of a distant signal applies to all signals until the next distant signal or fixed distant board, so you must be prepared to stop at all other stop signals even if the first one is cleared. | ||
[[File:Distant Signal Clear.webp|right|120px]] | [[File:Distant Signal Clear.webp|right|120px]] | ||
When cleared, distant signals: | '''When cleared, distant signals:''' | ||
* Inform the driver all associated stop signals are cleared | * Inform the driver all associated stop signals are cleared. | ||
* Are raised or lowered at a 45 degree angle. | * Are raised or lowered at a 45 degree angle. (Semaphore) | ||
* Display a green light. | * Display a green light. | ||
[[File:Distant Signal Caution.webp|right|120px]] | [[File:Distant Signal Caution.webp|right|120px]] | ||
When at caution, distant signals: | '''When at caution, distant signals:''' | ||
* Inform the driver that they should expect one of the following stop signals to be at danger and must slow down. | * Inform the driver that they should expect one of the following stop signals to be at danger and must slow down. | ||
* Are horizontal; at a 90 degree angle. | * Are horizontal; at a 90 degree angle. (Semaphore) | ||
* Display a yellow light. | * Display a yellow light. | ||
Distant signals do not require a nameplate, however if one is provided, a white triangle is marked on the plate to indicate that the associated signal cannot show a danger indication. | |||
== | === Fixed Distant Boards === | ||
[[File: | [[File:Fixed.png|frameless|right]] | ||
At some places where a distant signal would almost never be in the off position or would require a significant slow down on approach, a board displaying a semaphore distant with a fixed caution indication may be found. These boards should be treated as a distant signal displaying caution. A fixed distant may also take the form of a normal semaphore displaying a caution indication which cannot be changed. | |||
<br> | |||
==Shunt Discs== | ==Shunt Discs== | ||
Shunt discs comprise of a small white disc with a central red band. They are generally found at sidings, yards, or routes on the mainline against the normal direction of traffic, and are often mounted on the ground. Unlike a normal stop signal, shunt discs only allow a train to proceed ''as far as the line is clear, preparing to stop short of an obstruction'', so may be used to signal trains into an occupied area. | |||
[[File:Shunt Disc Clear.webp|right|120px]] | [[File:Shunt Disc Clear.webp|right|120px]] | ||
When cleared, shunt discs: | '''When cleared, shunt discs:''' | ||
* Allow the driver to proceed at | * Allow the driver to proceed at caution as far as the line is clear. | ||
* Are rotated 45 degrees. | * Are rotated 45 degrees. | ||
* Display a green light. | * Display a green light. | ||
[[File:Shunt Disc Danger.webp|right|120px]] | [[File:Shunt Disc Danger.webp|right|120px]] | ||
When at danger, shunt discs: | '''When at danger, shunt discs:''' | ||
* Do not allow the driver to pass the signal. | * Do not allow the driver to pass the signal. | ||
* Are horizontal. | * Are horizontal. | ||
* Display a red light. | * Display a red light. | ||
== Semaphore | === Yellow shunt discs === | ||
[[File: | A yellow shunt disc can sometimes be found at a head shunt, comprising a yellow band on a white or black painted disc. Despite being yellow, these signals are unrelated to distant signals. | ||
[[File:Yellow shunt disc off.png|right|120px]] | |||
'''When in the off position, yellow shunt discs:''' | |||
* Allow the driver to proceed at caution as far as the line is clear. | |||
* Are rotated 45 degrees. | |||
* Display a green light. | |||
[[File:Yellow shunt disc.png|right|120px]] | |||
'''When in the on position, yellow shunt discs:''' | |||
* Allow the driver to pass the signal towards the head shunt or siding, but not towards the running line. | |||
* Are horizontal. | |||
* Display a yellow light. | |||
<br> | |||
== Semaphore Subsidiary Signal == | |||
Subsidiary signals can be found mounted alongside stop signals. They allow the driver to proceed under special circumstances which are not normally permitted. When cleared, subsidiary signals display a small letter which indicates the type of subsidiary signal. | |||
"'''C'''" represents a calling-on signal (Currently the only type of subsidiary signal in-game.) When cleared, this type of signal allows a driver to proceed ''as far as the line is clear, preparing to stop short of an obstruction.'' A driver may therefore enter a block occupied by another vehicle. These are generally only found at platforms, and are primarily used for the coupling of multiple vehicles. | |||
[[File:Calling on signal off.png|right|150px]] | |||
'''When cleared, subsidiary signals:''' | |||
* Allow the driver to pass under the specified instruction displayed. | |||
* Are raised or lowered at a 45 degree angle. | |||
* Display a green light. | |||
[[File:Calling on signal on.png|right|150px]] | |||
'''When at danger, the driver must obey the associated stop signal. At danger, subsidiary signals:''' | |||
* Are horizontal; at a 90 degree angle. | |||
* Display a white light. | |||
<br> | |||
==Junction Signals== | |||
Whenever a line can diverge to multiple routes, a driver is always provided with an indication of which route they will take, often informing them whether they must slow down to safely traverse a junction. This principle is known as route signalling, a system used across the majority of the United Kingdom's railways. | |||
===Bracket Signals=== | |||
[[File:Bracket Signal.png|right|150px]] | |||
[[File:Theatre Route Indicator.png|right|100px]] | |||
[[File:Stacked shunt Signals.png|right|60px]] | |||
Stop signals mounted alongside each other on a bracket (a single post supporting multiple signals) indicate multiple routes and their associated directions. The relative height of each signal indicates the speed (and often importance) of each route, with lower mounted signals representing a route with a reduced speed limit. Signals at the same height indicate a shared speed limit. The bracket may be passed if any one signal is cleared. | |||
The same principle applies to bracket mounted distant signals, with each signal indicating a separate route. Shunt discs and subsidiary signals can also be found mounted on brackets, often indicating a route towards a siding or for other shunting movements. | |||
Note that bracket signals displaying diverging routes should not be confused with signals mounted on a gantry (a frame spanning multiple tracks), which apply to the lines or platform they are above. Signals applying to separate lines can be identified by significant spacing, and will be mounted directly above the line they apply to. | |||
===Route Indicators=== | |||
Instead of using separate signals to indicate routes, a device called a route indicator can be used to display several different routes to a driver whilst only requiring a single signal. | |||
Route indicators are generally comprised of a box located below a stop signal (or sometimes above for colour lights), which can display different numbers, letters or words, each signifying a platform number or line. These indications can be displayed mechanically by moving lettered cards, or electrically with dot matrix lights or fibre-optic displays. The route displayed is controlled by the position of the points ahead, and is automatically shown when the signal is cleared. | |||
===Stacked Shunt Discs=== | |||
Shunt discs can often be found stacked atop each other, with each disc indicating a separate route. The discs are read top to bottom, left to right, meaning that the top disc applies to the left-most route and so on. | |||
<br> | |||
==Flags and Hand Signals== | |||
Flags are one of the oldest methods of signalling, with a coloured flag being displayed by person to a driver to indicate a specific instruction. | |||
[[File:Flags.jpg|thumb|258x258px]] | |||
There are 3 coloured flags used on the railway: | |||
#<span style="color: red">Red flag</span> - Stop the train immediately | |||
#<span style="color: orange">Yellow flag</span> - Gives authority to pass a signal at danger | |||
#<span style="color: green">Green flag</span> - Gives authority to pass over an unsafe level crossing | |||
'''Hand signals must be displayed by flags during daytime, and by [[Tools|bardic lamp]] at night. The same meaning for each colour applies.''' | |||
Note that green flags are also used by guards, and should not be confused with a green hand signal. Flags are commonly used by trollers, so fixed signals should be followed unless you are confident a flag has been displayed with the authority of the signaller or staff. | |||
<br> | |||
==Level Crossing Repeaters== | |||
[[File:Crossing repeater red.png|100px|right]] | |||
Some automatic level crossings not monitored by a signal box utilise a level crossing repeater to inform drivers of the status of a level crossing ahead. The repeater has two states, displayed as flashing lights to a driver. Whilst they look similar to a colour light signal, their purposes should not be confused. Currently, [[Gleethrop Crossing]] is the only level crossing equipped with repeater signals. | |||
[[File:Crossing repeater white.png|100px|right]] | |||
'''When flashing red, the repeater indicates:''' | |||
* The crossing is unsafe or malfunctioning. | |||
* An approaching driver must stop short of the crossing. | |||
* Once stopped, the driver may proceed if safe to do so. | |||
'''When flashing white, the repeater indicates:''' | |||
* The crossing is functioning correctly, barriers are lowered and warning lights are displayed to road traffic. | |||
* An approaching driver may proceed at the speed limit if the crossing is clear of obstruction. | |||
<br> | |||
== Points Indicators == | |||
[[File:Points Indicator Unset.png|100px|right]] | |||
A points indicator is associated with hydro-pneumatic and certain other types of points and is identified by a sign showing the words 'Points indicator'. They display the following indications. | |||
'''Indication''': A red light that may be steady or flashing or no light is showing. | |||
'''Meaning''': Stop at the points indicator and contact the signaller unless otherwise authorised. | |||
[[File:Points Indicator Set.png|100px|right]] | |||
'''Indication''': A steady yellow light. | |||
'''Meaning''': The points to which it applies are fitting correctly. | |||
If a points indicator is passed without authority, it is a signal passed at danger. | |||
<br> | |||
==Banner | ==Banner Repeaters== | ||
[[File:repeaters and OFF indicator at MS.png|200px|right|A banner repeater at Masonfield]] | [[File:repeaters and OFF indicator at MS.png|200px|right|A banner repeater at Masonfield]] | ||
[[File:OFF Banner.gif|right|OFF position]][[File:ON banner.gif|right|ON Position]] | [[File:OFF Banner.gif|right|OFF position]][[File:ON banner.gif|right|ON Position]] | ||
Where the sighting of a signal is adversely affected by curvature or an intervening over bridge or station canopy, etc., an extra signal called a Banner Repeater can be installed to give drivers of approaching trains an earlier view of the indication shown | Where the sighting of a signal is adversely affected by curvature or an intervening over bridge or station canopy, etc., an extra signal called a Banner Repeater can be installed to give drivers of approaching trains an earlier view of the indication shown. | ||
These are similar to semaphore distant signals. When a banner repeater is at its 'on' state, with a horizontal line, it can be passed, but indicates that the stop signal ahead is at danger. When a banner repeater is at its 'off' state, with a diagonal line, it can be passed, and indicates that the stop signal ahead is cleared and can be passed safely. Unlike a distant signal however, the indication only repeats the first signal ahead of the banner repeater. | |||
Banner repeaters | There are two types of Banner Repeater Signals in the game, one being digital, commonly found at stations and lit up on a dot matrix format, and the other being standard banner repeaters found on the line. | ||
<br> | |||
== OFF/CD/RA Indicators == | == OFF/CD/RA Indicators == | ||
[[Off Indicator|OFF Indicators]] are found at stations with dispatching capabilities, and are used to inform the driver if they can move on from the station, and what to do. They are controlled by Train Dispatch Equipment Units (TDEU), which can usually be found at the side of the platform. These are currently present at [[Masonfield]], [[Gleethrop End]], [[Dovedale Central]], [[Dovedale East]], and [[Fanory Mill]], and could previously be found at [[Satus Services]] and [[Glassbury Junction]]. As of version 2.0, OFF indicators and CD/RA indicators are now separately displayed. A white OFF or CD/RA indicator means the associated signal is in front of the observer. A yellow OFF or CD/RA indicator means the associated signal is behind the observer. | |||
[[Off Indicator|OFF Indicators]] are found at stations with dispatching capabilities, and used to inform the driver if they can move on from the station, and what to do. They are controlled by Train Dispatch Equipment Units (TDEU), which | |||
* An illuminated OFF indication means the associated signal is | * An illuminated OFF indication means the associated signal is off, displaying a proceed aspect. | ||
* An illuminated indication | * An illuminated CD indication (close doors) is an instruction to close the train's power-operated doors. | ||
* An illuminated | * An illuminated RA or R indication (right away) means that station duties are complete and the train may depart.<br> | ||
'''OFF''' - Signal ahead is | '''OFF''' - Signal ahead is cleared<br> | ||
'''CD''' - Close Doors<br> | '''CD''' - Close Doors<br> | ||
'''RA''' - Right Away | '''RA''' - Right Away | ||
<gallery position="left"> | |||
File:OFF Sign.png|An OFF indicator showing OFF. | |||
File:CD RA Sign.png|Dispatch indicators showing CD and RA respectively. | |||
File:SatusTDEUs.png|An old TDEU once located at [[Satus Services]]. | |||
</gallery> | |||
== SPAD Indicator == | == SPAD Indicator == | ||
A SPAD indicator | A SPAD indicator may be positioned after a stop signal where there is a high likelihood of a serious collision should a SPAD (Signal Passed at Danger) occur at the signal. <ref> https://www.rssb.co.uk/standards-catalogue/CatalogueItem/RS521-Iss-6 </ref> They are normally unlit, but following a SPAD they display a steady red light between two flashing red lights arranged vertically. | ||
Any driver who sees a SPAD indicator illuminated must stop their train immediately and subsequently contact the signaller for further instructions, even if they can see that the signal pertaining to their line is showing a proceed aspect. SPAD indicators are mounted against a blue backplate | Any driver who sees a SPAD indicator illuminated must stop their train immediately and subsequently contact the signaller for further instructions, even if they can see that the signal pertaining to their line is showing a proceed aspect. SPAD indicators are mounted against a | ||
blue backplate with dot matrix lights. | |||
<br> | |||
== Semaphore Signals Out of Use (Removed) == | |||
[[File:Crossed out singal.png|right|150px]] | |||
If a semaphore signal is out of use, whether due to failure or not being in operation, they are provided with a cross. Signals that are signed out of use are '''not''' to be obeyed. If they are accompanied by other signals that are in use, they '''must''' be obeyed. | |||
The ability to 'cross up' signals was removed in Version 1.2, as signals were reworked to no longer break through standard use as in earlier versions. | |||
=== Disused Signals === | |||
[[File:Old signal at sat.png|frameless|100px|right]] | |||
There are two disused semaphore signals in the [[Satus Services|Satus]] area, owing to the short branch that formerly operated there. These signals are rusted away, and are no longer in use. Previews of Version 2.0 have shown that these signals are now preserved at Satus Services. | |||
== References == | == References == | ||
Revision as of 22:50, 7 May 2025
A signal is a tool that displays an indication of the track status ahead for drivers. There are several types of signals listed below that can be found in game. Refer to the Signalling Guide to learn how to operate signal boxes.
Signal Mechanisms
Railway signals take many shapes and forms. Dovedale Railway uses the standard semaphore signal.
Semaphore Signal
A semaphore signal is comprised of a rotating semaphore arm mounted at the top of a post or gantry, and a light behind a set of lenses which move with the arm. When a semaphore arm is in the horizontal position, it is referred to as being 'on'. When it is raised or lowered by 45 degrees, it is referred to as being 'off'. Signals that raise when off are known as upper quadrant signals, and those that lower are known as lower quadrant signals.
Colour Light Signal
Colour light signals utilise much brighter lights than semaphores, allowing the signal aspect to be seen clearly during the day without need for a physically moving signal. The lack of mechanical operation meant that colour lights were easier to maintain, more reliable, and often a similar price to installing new semaphores.
Colour light signals consist of multiple lights stacked vertically in a housing. Since more than two indications are possible per signal, one colour light signal could often replace a pair of stop and distant semaphore signals.
Stop Signal
Stop signals are the simplest type of signal, informing a driver if they have authority to proceed past the signal. The clearance of a stop signal proves to a driver that the route ahead is clear of an obstruction.
When cleared, stop signals:
- Allow the driver to proceed past the signal until the next stop signal reached.
- Are raised or lowered at a 45 degree angle. (Semaphore)
- Display a green light.

When at danger, stop signals:
- Do not allow the driver to pass the signal.
- Are horizontal; at a 90 degree angle. (Semaphore)
- Display a red light.
All controlled stop signals have a nameplate mounted to their post or gantry labelled with the code of the signal box controlling the signal and the corresponding signal and lever number for that box. When mounted alongside other signals, only one label may be provided.
Most semaphore stop signals are provided with a white diamond sign on the post. These indicate that the presence of a train is repeated in the signal box, and drivers do not need to notify the signaller if they are waiting at it.
Stop Boards

In certain situations such as uncontrolled stations or token working which require additional actions by the driver before departing, a stop board is installed instead of a signal, comprising a red circle on a white board reading "Stop". A stop board should be treated as a stop signal at danger, meaning a driver must always come to a complete stop at the board. Once stopped, the driver must follow all instructions written on the board before proceeding.
Distant Signal
Distant signals provide advanced warnings as to whether the next stop signals will be at danger or not. This is necessary due to the long braking distance of trains.
If the signal is at caution, you must slow down, expecting the next stop signal to be at danger. The indication of a distant signal applies to all signals until the next distant signal or fixed distant board, so you must be prepared to stop at all other stop signals even if the first one is cleared.
When cleared, distant signals:
- Inform the driver all associated stop signals are cleared.
- Are raised or lowered at a 45 degree angle. (Semaphore)
- Display a green light.

When at caution, distant signals:
- Inform the driver that they should expect one of the following stop signals to be at danger and must slow down.
- Are horizontal; at a 90 degree angle. (Semaphore)
- Display a yellow light.
Distant signals do not require a nameplate, however if one is provided, a white triangle is marked on the plate to indicate that the associated signal cannot show a danger indication.
Fixed Distant Boards

At some places where a distant signal would almost never be in the off position or would require a significant slow down on approach, a board displaying a semaphore distant with a fixed caution indication may be found. These boards should be treated as a distant signal displaying caution. A fixed distant may also take the form of a normal semaphore displaying a caution indication which cannot be changed.
Shunt Discs
Shunt discs comprise of a small white disc with a central red band. They are generally found at sidings, yards, or routes on the mainline against the normal direction of traffic, and are often mounted on the ground. Unlike a normal stop signal, shunt discs only allow a train to proceed as far as the line is clear, preparing to stop short of an obstruction, so may be used to signal trains into an occupied area.
When cleared, shunt discs:
- Allow the driver to proceed at caution as far as the line is clear.
- Are rotated 45 degrees.
- Display a green light.

When at danger, shunt discs:
- Do not allow the driver to pass the signal.
- Are horizontal.
- Display a red light.
Yellow shunt discs
A yellow shunt disc can sometimes be found at a head shunt, comprising a yellow band on a white or black painted disc. Despite being yellow, these signals are unrelated to distant signals.

When in the off position, yellow shunt discs:
- Allow the driver to proceed at caution as far as the line is clear.
- Are rotated 45 degrees.
- Display a green light.

When in the on position, yellow shunt discs:
- Allow the driver to pass the signal towards the head shunt or siding, but not towards the running line.
- Are horizontal.
- Display a yellow light.
Semaphore Subsidiary Signal
Subsidiary signals can be found mounted alongside stop signals. They allow the driver to proceed under special circumstances which are not normally permitted. When cleared, subsidiary signals display a small letter which indicates the type of subsidiary signal.
"C" represents a calling-on signal (Currently the only type of subsidiary signal in-game.) When cleared, this type of signal allows a driver to proceed as far as the line is clear, preparing to stop short of an obstruction. A driver may therefore enter a block occupied by another vehicle. These are generally only found at platforms, and are primarily used for the coupling of multiple vehicles.

When cleared, subsidiary signals:
- Allow the driver to pass under the specified instruction displayed.
- Are raised or lowered at a 45 degree angle.
- Display a green light.

When at danger, the driver must obey the associated stop signal. At danger, subsidiary signals:
- Are horizontal; at a 90 degree angle.
- Display a white light.
Junction Signals
Whenever a line can diverge to multiple routes, a driver is always provided with an indication of which route they will take, often informing them whether they must slow down to safely traverse a junction. This principle is known as route signalling, a system used across the majority of the United Kingdom's railways.
Bracket Signals


Stop signals mounted alongside each other on a bracket (a single post supporting multiple signals) indicate multiple routes and their associated directions. The relative height of each signal indicates the speed (and often importance) of each route, with lower mounted signals representing a route with a reduced speed limit. Signals at the same height indicate a shared speed limit. The bracket may be passed if any one signal is cleared.
The same principle applies to bracket mounted distant signals, with each signal indicating a separate route. Shunt discs and subsidiary signals can also be found mounted on brackets, often indicating a route towards a siding or for other shunting movements.
Note that bracket signals displaying diverging routes should not be confused with signals mounted on a gantry (a frame spanning multiple tracks), which apply to the lines or platform they are above. Signals applying to separate lines can be identified by significant spacing, and will be mounted directly above the line they apply to.
Route Indicators
Instead of using separate signals to indicate routes, a device called a route indicator can be used to display several different routes to a driver whilst only requiring a single signal.
Route indicators are generally comprised of a box located below a stop signal (or sometimes above for colour lights), which can display different numbers, letters or words, each signifying a platform number or line. These indications can be displayed mechanically by moving lettered cards, or electrically with dot matrix lights or fibre-optic displays. The route displayed is controlled by the position of the points ahead, and is automatically shown when the signal is cleared.
Stacked Shunt Discs
Shunt discs can often be found stacked atop each other, with each disc indicating a separate route. The discs are read top to bottom, left to right, meaning that the top disc applies to the left-most route and so on.
Flags and Hand Signals
Flags are one of the oldest methods of signalling, with a coloured flag being displayed by person to a driver to indicate a specific instruction.

There are 3 coloured flags used on the railway:
- Red flag - Stop the train immediately
- Yellow flag - Gives authority to pass a signal at danger
- Green flag - Gives authority to pass over an unsafe level crossing
Hand signals must be displayed by flags during daytime, and by bardic lamp at night. The same meaning for each colour applies.
Note that green flags are also used by guards, and should not be confused with a green hand signal. Flags are commonly used by trollers, so fixed signals should be followed unless you are confident a flag has been displayed with the authority of the signaller or staff.
Level Crossing Repeaters

Some automatic level crossings not monitored by a signal box utilise a level crossing repeater to inform drivers of the status of a level crossing ahead. The repeater has two states, displayed as flashing lights to a driver. Whilst they look similar to a colour light signal, their purposes should not be confused. Currently, Gleethrop Crossing is the only level crossing equipped with repeater signals.

When flashing red, the repeater indicates:
- The crossing is unsafe or malfunctioning.
- An approaching driver must stop short of the crossing.
- Once stopped, the driver may proceed if safe to do so.
When flashing white, the repeater indicates:
- The crossing is functioning correctly, barriers are lowered and warning lights are displayed to road traffic.
- An approaching driver may proceed at the speed limit if the crossing is clear of obstruction.
Points Indicators

A points indicator is associated with hydro-pneumatic and certain other types of points and is identified by a sign showing the words 'Points indicator'. They display the following indications.
Indication: A red light that may be steady or flashing or no light is showing.
Meaning: Stop at the points indicator and contact the signaller unless otherwise authorised.

Indication: A steady yellow light.
Meaning: The points to which it applies are fitting correctly.
If a points indicator is passed without authority, it is a signal passed at danger.
Banner Repeaters


Where the sighting of a signal is adversely affected by curvature or an intervening over bridge or station canopy, etc., an extra signal called a Banner Repeater can be installed to give drivers of approaching trains an earlier view of the indication shown.
These are similar to semaphore distant signals. When a banner repeater is at its 'on' state, with a horizontal line, it can be passed, but indicates that the stop signal ahead is at danger. When a banner repeater is at its 'off' state, with a diagonal line, it can be passed, and indicates that the stop signal ahead is cleared and can be passed safely. Unlike a distant signal however, the indication only repeats the first signal ahead of the banner repeater.
There are two types of Banner Repeater Signals in the game, one being digital, commonly found at stations and lit up on a dot matrix format, and the other being standard banner repeaters found on the line.
OFF/CD/RA Indicators
OFF Indicators are found at stations with dispatching capabilities, and are used to inform the driver if they can move on from the station, and what to do. They are controlled by Train Dispatch Equipment Units (TDEU), which can usually be found at the side of the platform. These are currently present at Masonfield, Gleethrop End, Dovedale Central, Dovedale East, and Fanory Mill, and could previously be found at Satus Services and Glassbury Junction. As of version 2.0, OFF indicators and CD/RA indicators are now separately displayed. A white OFF or CD/RA indicator means the associated signal is in front of the observer. A yellow OFF or CD/RA indicator means the associated signal is behind the observer.
- An illuminated OFF indication means the associated signal is off, displaying a proceed aspect.
- An illuminated CD indication (close doors) is an instruction to close the train's power-operated doors.
- An illuminated RA or R indication (right away) means that station duties are complete and the train may depart.
OFF - Signal ahead is cleared
CD - Close Doors
RA - Right Away
-
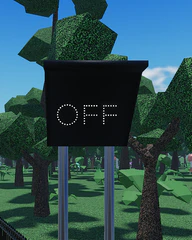 An OFF indicator showing OFF.
 -
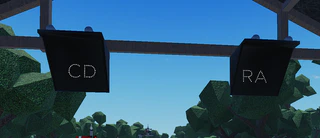 Dispatch indicators showing CD and RA respectively.
 -
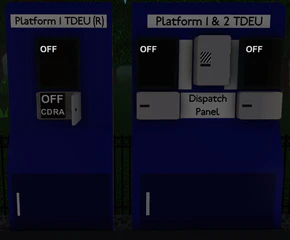 An old TDEU once located at Satus Services.


SPAD Indicator
A SPAD indicator may be positioned after a stop signal where there is a high likelihood of a serious collision should a SPAD (Signal Passed at Danger) occur at the signal. [1] They are normally unlit, but following a SPAD they display a steady red light between two flashing red lights arranged vertically. Any driver who sees a SPAD indicator illuminated must stop their train immediately and subsequently contact the signaller for further instructions, even if they can see that the signal pertaining to their line is showing a proceed aspect. SPAD indicators are mounted against a blue backplate with dot matrix lights.
Semaphore Signals Out of Use (Removed)

If a semaphore signal is out of use, whether due to failure or not being in operation, they are provided with a cross. Signals that are signed out of use are not to be obeyed. If they are accompanied by other signals that are in use, they must be obeyed.
The ability to 'cross up' signals was removed in Version 1.2, as signals were reworked to no longer break through standard use as in earlier versions.
Disused Signals

There are two disused semaphore signals in the Satus area, owing to the short branch that formerly operated there. These signals are rusted away, and are no longer in use. Previews of Version 2.0 have shown that these signals are now preserved at Satus Services.