
Signals
More actions
A signal is a tool that displays an indication of the track status ahead for drivers. There are several types of signals listed below that can be found in game. Refer to the Signalling Guide to learn how to operate signal boxes.
Colour Light Signals
Colour light signals utilise much brighter lights than semaphores, allowing the signal aspect to be seen clearly during the day without need for a physically moving signal. The lack of mechanical operation meant that colour lights were easier to maintain, more reliable, and often a similar price to installing new semaphores.
Colour light signals consist of multiple lights stacked vertically in a housing. Since more than two indications are possible per signal, one colour light signal could often replace a pair of stop and distant semaphore signals.
Main Aspect

| Description of aspect | Colour of aspect | Meaning | Diagram |
|---|---|---|---|
| Danger | Red Light | Stop |  |
| Caution | One yellow light | Proceed: Be prepared to stop at the next signal |  |
| Clear | Green light | Proceed: Next signal displaying a proceed aspect |  |
Additional aspects are used on british railways, that aren't displayed in-game.
Aspects are displayed to the driver in a Green -> Single Yellow -> Red sequence.
Route Indications

An indication of route is provided by a theatre type indicator where a figure of letter is displayed next to the signal when a proceed aspect is displayed at the signal.
Semaphore Signals
A semaphore signal is comprised of a rotating semaphore arm mounted at the top of a post or gantry, and a light behind a set of lenses which move with the arm. When a semaphore arm is in the horizontal position, it is referred to as being 'on'. When it is raised or lowered by 45 degrees, it is referred to as being 'off'. Signals that raise when off are known as upper quadrant signals, and those that lower are known as lower quadrant signals.
Distant Signals
A distant signal comprises a yellow arm with a fish-tail end and a black chevron. It may take the form of a reflectorised board.
| Position | Indication by day | Indication by night | Meaning | Diagram |
|---|---|---|---|---|
| Caution | Arm horizontal | Yellow light (or reflectorised indication) | Be prepared to stop at the home signal, or other specified place to which the distant signal applies |  |
| Clear | Arm raised or lowered 45° | Green light | All associated signals worked from the same signal box are clear |
Stop Signals
A stop signal comprises a red arm with a square end and a vertical white stripe.
| Position | Indication by day | Indication by Night | Meaning | Diagram |
|---|---|---|---|---|
| Danger | Arm horizontal | Red light | Stop |  |
| Clear | Arm raised or lowered 45° | Green light | Proceed |
Sometimes a distant signal may be positioned on the same post as a stop signal. Where this is the case:
- the stop signal is worked by the signal box at that location, and
- the distant signal is worked by the signal box ahead.
Where this is only one distant signal provided for a diverging junction, it applies to all trains approaching it.
Subsidiary Signals
A subsidiary signal is placed below the main arm of a stop signal and comprises a small white arm with horizontal red stripes.
At present, there is only a calling on signal. This is distinguished by the letter C, which is displayed when in the off position. These calling on signals, when in the off position, indicate that the line ahead may be occupied. Drivers are to proceed cautiously towards the next stop signal (or buffer stops if there is not a signal ahead). Drivers are to be prepared to stop short of any obstruction. Where this signal is in the on position, you must obey the main arm.
Shunting signals
A shunting signal is comprised of a disc, normally mounted at ground level.
| Position | Indication by day | Indication by night | Meaning | Diagram |
|---|---|---|---|---|
| Normal | A white disc with a red horizontal bar | Either a red light or a white light | Stop |  |
| Normal | A white or black disc with a yellow horizontal bar | Yellow light | Stop - Applies only to movements travelling in the direction to which the signal can be cleared, normally the mainline. Other movements may pass the signal without being clear. |  |
| Proceed | Disc as described above turned 45° | Green light | Proceed as far as the line is clear |  |
Route Indication
| Method | Meaning | Diagram |
|---|---|---|
| Positioning and stepping of signals | Signal 1 applies to the straight route
Signals 2 and 3 apply to the successive routes to the left of the straight route. Routes to the right of the straight route are similarly indicated by the signals placed on the right of signal 1 |
 |
| Positioning stop signals or shunting signals vertically above one another | Signal 1 applies to the route on the extreme left
Signals 2 and 3 apply to the successive routes from the left to the right |
 |
| Providing only one signal, and when it is cleared, displaying a figure(s) or letter(s) next to the signal | The figure or letter indicates which route has been set |  |
Repeating Signals and Other Indicators
Banner repeating signals
Banner repeating signals are provided on the approach to certain signals and give advance information about a signal which has a restricted sighting distance, normally due to curvature in the line, tunnels or buildings, etc.
A banner repeating signal consists of a frame containing an illuminated small black semaphore which is square ended.
| Position | Indication | Meaning | Diagram |
|---|---|---|---|
| On | Horizontal arm | The signal to which it applies is at danger or at caution if it is a distant signal |  |
| Off | Arm at angle of 45° | Signal to which it applies is displaying a proceed aspect |  |
Off Indicators

An off indicator comprises an illuminated sign with shows the word "OFF" when the signal to which it applies shows a proceed aspect. It is provided in order to allow the Guard or person in charge of the platform to check the signal is clear before starting the train. No indication is shown on the indicator when the signal to which it applies is at Danger.
On a platform line, the Driver may, rely only upon the off indicator showing the word "OFF" as an indication that the signal to which it applies is showing a proceed aspect. The Driver must not in these circumstances assume the line is clear for the train, because the signal may have been cleared for a train ahead.
Uniquely to dovedale, off indicators showing a proceed aspect to the opposite direction to the direction the staff member views the sign are displayed in yellow text.
Limit of Shunt Indicators
A limit of shunt indicator is comprised of a normally white sign, displaying any variation of the words "LIMIT OF SHUNT". The Driver or person controlling the movement must make sure no part of the train passes a Limit of Shunt indicator unless they are authorised to do so by the Signaller.
Stop Boards

A stop board or indicator comprises a board or indicator showing the word 'STOP'. It may also be illuminated and show other instructions.
The driver or person controlling the movement must stop the train at the stop board or indicator, and only proceed:
- in accordance with the instructions displayed, or
- when given permission by the authorised person.
A stop board has the same meaning as a signal at Danger. If a stop board is passed without authority, it will be considered as a signal passed at Danger.
Points Indicators


A points indicator comprises a sign showing a variation of "POINTS INDICATOR", and when the hydro-pneumatic facing points to which it applies are correctly fitting, a steady yellow light is displayed adjacent to the sign.
If no light is displayed, the Driver or person controlling the movement must stop the train at the indicator and only pass over the hydro-pneumatic facing points if they have been secured.
SPAD Indicator

At certain locations, a Signal Passed at Danger indicator is provided. This comprises a three aspect signal head and is normally positioned in advance of the signal to which it applies. The signal has a blue border to denote its difference from a normal 3 aspect signal. When no aspect is displayed, trains may proceed as normal. When the top and red bottom aspects are flashing red, with the centre aspect displaying a steady red light, you must stop as a signal has been passed at Danger. If the Driver or person controlling the movement sees a SPAD indicator illuminated, the train must be stopped immediately and await signallers instructions. This instruction must be carried out even if the indicator applies to a signal on another line.
Flags and Hand Signals

Flags are one of the oldest methods of signalling, with a coloured flag being displayed by person to a driver to indicate a specific instruction. Flags can convey a variety of meanings depending on the circumstances. Primarily these will be as follows:
| Description | Indication by day | Indication by night | Meaning |
|---|---|---|---|
| Danger | Red Flag | Red Handlamp or other light waved vigorously | Danger: Stop immediately |
| Caution | Yellow Flag | Yellow Handlamp held steady | Proceed past signal at caution when signal is at danger. |
| Proceed | Green Flag | Green Handlamp held steady | Authority to pass over a level crossing |
A yellow flag may be displayed from an intermediate absolute block signalbox during single line working.
Note that flags can commonly be abused whilst in-game due to them being a publicly accessible tool, it is advised to only take indications from signallers or staff.
Level Crossing Repeaters

Some automatic level crossings not monitored by a signal box utilise a level crossing repeater to inform drivers of the status of a level crossing ahead. The repeater has two states, displayed as flashing lights to a driver. Whilst they look similar to a colour light signal, their purposes should not be confused. Currently, Gleethrop Crossing is the only level crossing equipped with repeater signals.

When flashing red, the repeater indicates:
- The crossing is unsafe or malfunctioning.
- An approaching driver must stop short of the crossing.
- Once stopped, the driver may proceed if safe to do so.
When flashing white, the repeater indicates:
- The crossing is functioning correctly, barriers are lowered and warning lights are displayed to road traffic.
- An approaching driver may proceed at the speed limit if the crossing is clear of obstruction.
CD/RA Indicators
CD/RA Indicators are controlled by Train Dispatch Equipment Units (TDEU), which can usually be found at the side of the platform. These are currently present at Masonfield, Gleethrop End, Dovedale Central, Dovedale East, and Fanory Mill, and could previously be found at Satus Services and Glassbury Junction. As of version 2.0, CD/RA indicators are now separately displayed. A white CD/RA indicator means the associated signal is in front of the observer. A yellow OFF or CD/RA indicator means the associated signal is behind the observer.
- An illuminated OFF indication means the associated signal is off, displaying a proceed aspect.
- An illuminated CD indication (close doors) is an instruction to close the train's power-operated doors.
- An illuminated RA or R indication (right away) means that station duties are complete and the train may depart.
OFF - Signal ahead is cleared
CD - Close Doors
RA - Right Away
-
 Dispatch indicators showing CD and RA respectively.
 -
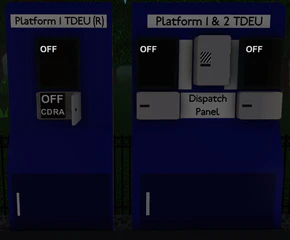 An old TDEU once located at Satus Services.


SPAD Indicator
A SPAD indicator may be positioned after a stop signal where there is a high likelihood of a serious collision should a SPAD (Signal Passed at Danger) occur at the signal. [1] They are normally unlit, but following a SPAD they display a steady red light between two flashing red lights arranged vertically. Any driver who sees a SPAD indicator illuminated must stop their train immediately and subsequently contact the signaller for further instructions, even if they can see that the signal pertaining to their line is showing a proceed aspect. SPAD indicators are mounted against a blue backplate with dot matrix lights.
Semaphore Signals Out of Use (Removed)

If a semaphore signal is out of use, whether due to failure or not being in operation, they are provided with a cross. Signals that are signed out of use are not to be obeyed. If they are accompanied by other signals that are in use, they must be obeyed.
The ability to 'cross up' signals was removed in Version 1.2, as signals were reworked to no longer break through standard use as in earlier versions.
Disused Signals

There are two disused semaphore signals in the Satus area, owing to the short branch that formerly operated there. These signals are rusted away, and are no longer in use. Previews of Version 2.0 have shown that these signals are now preserved at Satus Services.