Signalling Guide/Interlocking Version
More actions
This page is no longer in use as of the release of V2.0. All edits should be made to the Signalling Guide instead.
Introduction
Signalling is one of the most important parts of any railway. It exists to ensure the safety of people, trains, and the surrounding infrastructure. For the most part, this is ensured by having one train, in one section, at one time.
This guide will cover the majority of information needed to learn signalling in Dovedale. Beforehand it is essential that you have read the Signals and Signs pages so that you have sufficient knowledge of topics that are covered in this guide.
Chapter 1 will outline the basic principles behind signalling, Chapter 2 will familiarise you with how to operate signalling equipment, and Chapters 3-7 will explain all the procedures and different methods of working needed to start signalling. Chapter 8, along with the Qualified Signaller Handbook, provide additional resources and further detail on signalling if you are interested. Once you have learnt signalling, you can apply to become a Qualified Signaller to access exclusive priveleges.
The Development of Signalling
| 1.2 - The Basics: Block Signalling |
|---|
|
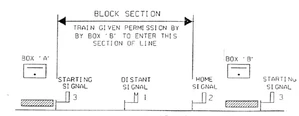
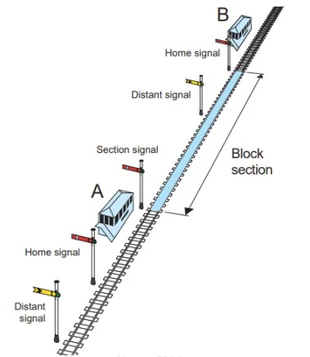
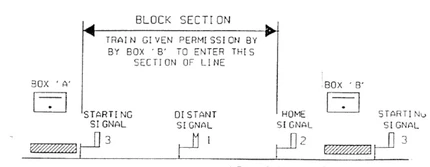
Block signalling is the first principle of all modern signalling systems; the general principle being that there should only be one train, in one section, at one time, with few exceptions. Absolute block came as a result of incidents in the time interval system in the 1850s. It was made mandatory for all railways in 1889 and forms the basis of all modern railway signalling. In fact, there are still many signal boxes working under this methodology today. In principle:
|
Signalling Equipment
| 2.1 - Lever Frame | ||||||||||||||||||||
|---|---|---|---|---|---|---|---|---|---|---|---|---|---|---|---|---|---|---|---|---|
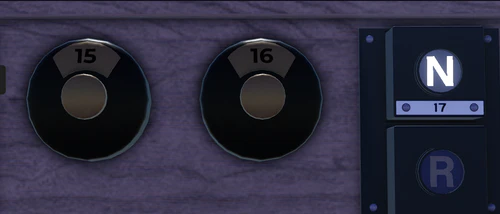
 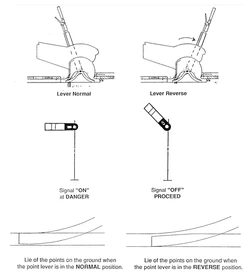  IntroductionThe lever frame is perhaps the most important part of a mechanical signal box, controlling most of the signalling infrastructure in the surrounding area. If a lever is in the frame/pointing away from you, it is referred to as being in the "normal" position. If a lever is out of the frame/pointing towards you, it is in the "reversed" position. For signals, this means that a signal is "on" when its lever is normal, and "off" when its lever is reversed. Attached to each lever is the "pull plate" which states the lever's number, description, and a list of levers which must be pulled prior to pulling the current lever. An example can be seen to the right. Whilst the lever descriptions may seem cryptic at first, Section 2.3 (Track Layout Diagrams) will explain the meaning behind them. InterlockingMost levers will require the signaller to have certain other levers in the reversed or normal position before that specific lever can be reversed. This is known as interlocking, a core concept of signalling which ensures the safe passage of trains, preventing situations such as a signaller clearing a signal over unset points, moving points whilst a signal is cleared over them, clearing a distant signal without all stop signals cleared ahead, etc. This concept will be further discussed in Section 2.10 (Clearing Routes), which will use your knowledge of signalling equipment to safely move trains through your area of control. Lever ColouringLevers are coloured to help you identify their function at a glance. A white stripe in the centre of a signal lever indicates that it is electronically released by another signal box. Please note, in some cases these differ from real life standards. The colours currently in use are as follows:
Lever HandlesSome levers have shortened handles. For signal levers, this indicates that a mechanically operated signal has been replaced with an electrically operated semaphore or colour light signal. For blue over black points levers, this indicates that the points and FPLs have been motorised and automated. For white over blue FPL levers, this indicates that the FPL has been motorised and disconnected from the lever, but the lever still operates the interlocking mechanism and must be used as if it were a functional FPL. |
| 2.7 - Barrier Pedestals & Gate Wheels |
|---|
|
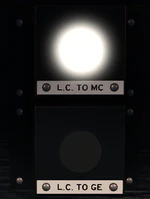
In most signal boxes, manually controlled level crossings are operated by a barrier pedestal. The barrier pedestal has two interactable buttons: "Barriers Lower" and "Barriers Raise". Some crossings have "On-call" functionality; these can be kept down until a road user presses a plunger which activates an annunciator on the level crossing control. You then may raise the level crossing. After 3-5 minutes or when needed, the level crossing can then be lowered. Before you can clear any signals over the crossing, you must:
After all trains have passed and it is safe to do so, you should raise the barriers. Marigot Crossing Signal Box is fitted with a gate wheel. The same procedure should be followed, however the gates are operated through the "R" and "F" keys on your keyboard, and the "Gate Stops" and "Gate Locks" levers must both be normal to move the gates. Some boxes are fitted with a crossing interlock lever. This must be correctly set before signals can be cleared over the crossing. 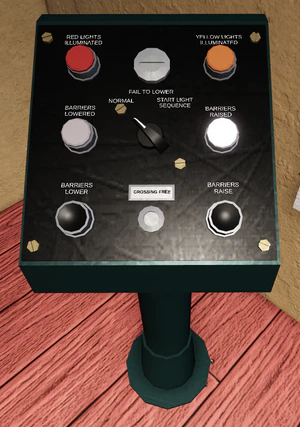 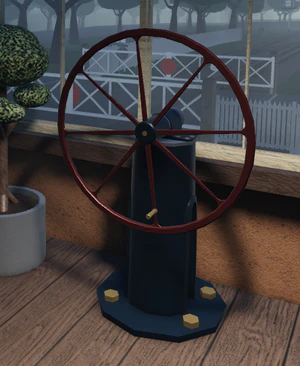 |
| 2.10 - Clearing Routes |
|---|
|
Now that you have a good understanding of how signalling equipment works, this knowledge can be put into practice by completing what we set out to do: ensuring the safe movement of trains throughout the signal box's area of control. This section will discuss the overall process of signalling trains within your area of control. You will need to read chapters 3-5 to learn about methods of working, that being the regulations for sending trains between boxes. It is suggested you re-read this section after you have read the rest of the guide, as it will help to consolidate the general process of signalling a train. Below are the steps you should follow to signal a train: 1. Determine train informationThe first step to signalling a train through you area is getting the relevant information for that train. You will need to know its classification, destination, location from which it will be approaching, (possibly) length, and any other relevant information before deciding how to route it. There are really only two places a train can come from: either from spawning in your area, or offered from another signal box. If a train spawns in your area, you will likely be able see the train and its destination UI which will provide all the information necesssary. If it is not visible, try to communicate with the driver to obtain the needed information, or signal it ahead into a platform or line where you can see the train (this is often the case for MS and GJ). If a train has been offered by another box, the signaller should provide you with any required information for that train by telephone, or it will be implied by bell codes etc. 2. Set routeOnce you know the necessary information, you should decide how you will route it through your area. Consider what platform to use, whether there are length restrictions, if the destination can only be accessed by a certain line/platform etc. Look at the diagram, starting from the line the train will approach from, tracing a route towards the destination. Consider which points and FPLs you will need to set, and move them to the correct position. Take note of which signals will need to be cleared, but do not clear them immediately. Note that Chapter 6 covers routing procedures in further detail. 3. Clear signalsWhen the train has entered the section in rear of your box, you should clear your home signal(s) for the route you have set. If the interlocking prevents the signal from clearing, check what you need to change by looking at the interlocking hints. Once you receive clearance to send the train to the next signal box (covered in Chapters 3-5), you can clear the starter signal(s) and distant signal. |
Absolute Block Signalling
| 3.3 - Bell Signals |
|---|
|
Bell signals are used to communicate between signal boxes, and are still used today in lieu of telephone communications. Bell codes have distinct advantages over verbal communication, namely:
A list of commonly used bell codes can be found within all signal boxes, however a complete list can be found on the bell codes page. You must acknowledge all bell signals by repeating them. You must not consider any bell signal as understood until it has been correctly acknowledged. You must send call attention (1) and have it acknowledged before you send any other bell signal, except for:
In most boxes, there is more than 1 bell. To differentiate between each bell, you can click on the metal bell itself to hear the sound. This will not send a signal to the other signal box, and can only be heard by your player. |
| 3.5 - Procedure: Opening, Closing & Testing |
|---|
Opening a Signal BoxWhen you open your signal box you must send opening of signal box to all surrounding signal boxes.
Closing a Signal BoxWhen you close your signal box you must:
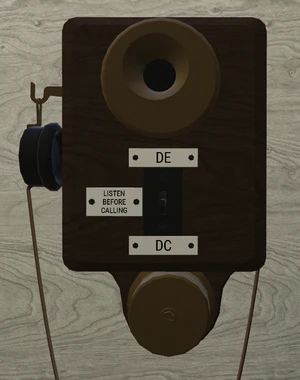
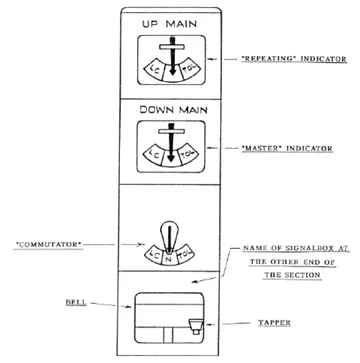
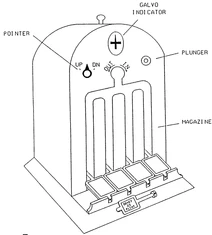
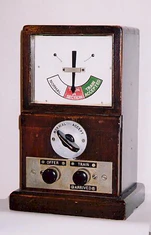
Testing EquipmentAs soon as possible after opening, if no trains are immediately due to be signalled, you must test your bells and block instruments. You, signaller "A", will be sending testing equipment to signal box "B". A: Send call attention (1)
|
| 3.6 - Procedure: Shunt Into Forward Section |
|---|
|
This regulation must be used when a train needs to pass your last stop signal into the block section for shunting purposes. If a train is to be shunted in the wrong direction of a double line, you must use 3.7 Blocking Back instead. When sending shunt into forward section, you must:
If you receive shunt into forward section you must:
|
| 3.7 - Procedure: Blocking Back |
|---|
|
This regulation must be used when you must send a train in the wrong direction of a double line for shunting purposes. If you're shunting a train in the right direction, you must use 3.6 shunt into forward section. If you are intending to send Blocking Back, you must:
When you are receiving Blocking Back, you must:
You must not acknowledge blocking back if you have allowed a movement toward the sending signal box which would conflict with the shunting movement at the sending signal box. On a single line, you must use shunting train into forward section instead of blocking back. |
| 3.8 - Procedure: Cancelling & Train Incorrectly Described |
|---|
CancellingIf a train is not going to proceed but you have already sent is line clear or train entering section, you must:
If you receive cancelling (3-5) you must acknowledge it and place your commutator to normal. Train Incorrectly DescribedIf you have sent the incorrect line clear and the signal box in advance has acknowledged it, you must:
If you receive train incorrectly described (5-3), you must acknowledge it and then acknowledge the correct is line clear. Do not move the commutator on the block instrument. |
| 3.9 - Procedure: Obstruction Danger |
|---|
When to SendYou must send obstruction danger if you need to stop trains coming towards your signal box due to an obstruction or other emergency within the block section. You must immediately, and without sending call attention, send obstruction danger (6) to all relevant signal boxes. You must send obstruction danger even if you have not received is line clear or train entering section. You must also send obstruction danger if a train is approaching which you have not:
You do not need to send obstruction danger if you can move facing points to a line that is clear. Sending Obstruction DangerWhen sending obstruction danger (6) you must:
You must then tell all relevant signallers the reason for sending obstruction danger. You must then reach a clear understanding of the lines affected and which can be re-opened for trains. If you receive train or vehicles proceeding without authority in the right direction (4-5-5) after sending obstruction danger, you must take all possible actions to stop the approaching train. If you receive cancelling for a train which has been acknowledged before you sent obstruction danger, you must acknowledge it but keep the block instrument at train on line. Receiving Obstruction DangerIf you receive obstruction danger (6) you must:
If no train has been signalled towards the sending signal box, you must acknowledge obstruction danger. If you cannot stop a train heading towards the signal box, or there is already a train in section, you must not acknowledge obstruction danger and immediately send train or vehicles proceeding without authority in the right direction. If you succeed in stopping a train, you must then acknowledge obstruction danger and send cancelling. You must then find out why obstruction danger was sent, and reach a clear understanding of the lines that remain blocked and which can be re-opened for trains. Obstruction RemovedWhen the obstruction has been removed, or if a train can pass clear of the obstruction, you must send call attention followed by obstruction removed (2-1-2) and place your block instrument to normal. However, if there is a train in section you must not send obstruction removed until that train is clear of the section. |
| 3.10 - Procedure: Train or Vehicles Proceeding Without Authority |
|---|
Train or vehicles proceeding without authority in the right direction (4-5-5)If a train or vehicle proceeds without authority in the right direction, you must:
If you receive train or vehicle proceeds without authority in the right direction, you must:
If there is already a train in section, you must:
If there is no train in section you must send train out of section and signal the next train as normal. Train or vehicles proceeding without authority in the wrong direction (2-5-5)If a train or vehicle proceeds without authority in the wrong direction, you must:
If you receive train or vehicle proceeds without authority in the wrong direction, you must:
|
Electric Token Block Signalling
| 4.2 - Signalling Regulations |
|---|
|
Signalling regulations under Electric Token Block are very similar to that of Absolute block, with a few key differences described below. Note that sections 3.8, 3.9, and 3.10 of AB apply to ETB unchanged, so will not be discussed. Offering and Sending TrainsWhen offering a train, you must follow the same procedures as described in Absolute Block section 3.4, with the following differences:
Opening, Closing & TestingThe procedures for opening and closing are identical to that described in section 3.5. The following procedure must be used when testing equipment for an ETB section: You, signaller "A", will be sending testing equipment to signal box "B". A: Send call attention (1)
ShuntingIf a train is required to enter the block section for shunting purposes, you must:
|
Tokenless Block Signalling
| 5.3 - Tokenless Block - Operation |
|---|
|
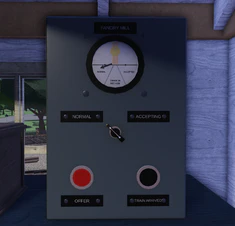
Tokenless block operation is largely different compared to other methods of working in game. Bell signals are not needed for this method of working. To offer a train, you must perform the following:
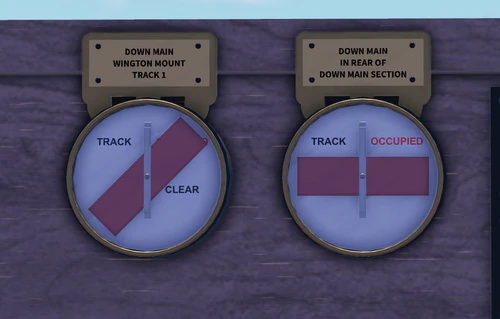
After offering, you should inform the signaller at the adjacent box of the train headcode. An example script could be: "Hello, Satus Signaller. Is the line clear for train 2F05? (Or Two Foxtrot Zero Five, to avoid filter.)", "Line is clear for train 2F05.", "Thank you." If you are unable to accept, then you should say: "No, train 2F05 refused." Note that you can also do this while the train is still offering, or even after the train was accepted. For ease of operation, Dovedale's TB Instruments have sounds in them that can be used as alerts similar to bell codes in other block instruments. If the accepting box's acceptance lever is not set to accepting, it will make a bell sound alerting them. Once their acceptance lever has been changed to accepting, the box that offered a train will be notified with a bell. Once the section signal is cleared and the train has passed it, the train will occupy a track circuit, causing both boxes' TB instruments to move to "Train In Section". When the train arrives at the receiving box it will activate a treadle or track circuit. (Anything else will cause the system to prevent Train Arrived from being pressed) If the train is complete with a tail lamp, the accepting box will then turn the acceptance lever to normal, before pressing Train Arrived to reset the block instrument to normal. When accepting, simply perform the actions of the accepting signal box above. If the offering box needs to cancel the train, the signaller must ask the accepting box to turn their block instrument to Normal then press Train Arrived to reset it. If the train despawns mid-section, the accepting signal box must turn their block instrument to Normal and press Train Arrived, then notify the offering signal box that the train has despawned. |
Operating Signals
| 6.1 - Clearing and Replacing Signals |
|---|
Clearing Stop SignalsBefore clearing a stop signal, you must ensure that:
Where the next stop signal is at danger, you must not clear a signal that cannot display a caution aspect until the train is nearly at a stand. This is to ensure that the driver's speed is controlled to stop at the next signal. Replacing Stop SignalsYou must replace a stop signal to danger as soon as the last vehicle of the trainset has passed the signal, and it has passed over all points facing to the movement. Clearing Distant SignalsBefore clearing a distant signal, you must ensure that all stop signals until the next distant signal or until the end of the section are set to clear. Replacing Distant SignalsYou must replace a distant signal to caution as soon as the train has passed the signal. Clearing Shunt SignalsYou should always attempt to clear all shunt signals required for the movement before allowing the driver to proceed. If you cannot clear all shunt signals, and you need to stop the train at an intermediate shunt signal, you should first advise the driver. |
| 6.2 - Authorising Signals to be Passed at Danger |
|---|
|
Before authorising a driver to pass a signal at danger, you must ensure that:
When passing a signal at danger, you must reach a clear understanding with the driver as to what move will occur. You must tell the driver:
You may then provide verbal authority to pass the signal, or provide a yellow handsignal. |
| 6.3 - Making Unsignalled Moves |
|---|
|
Before making an unsignalled move, you must ensure that:
You must reach a clear understanding with the driver as to what move will occur. You must then either:
|
| 6.4 - Signal Passed at Danger Without Authority (SPAD) |
|---|
|
If a train has passed a signal at danger, or you have been made aware of a train heading towards your signal box without authority, you must:
|
Routing and Regulating Trains
| 7.3 - Train Classifications | |||||||||||||||||||||||||||||||||
|---|---|---|---|---|---|---|---|---|---|---|---|---|---|---|---|---|---|---|---|---|---|---|---|---|---|---|---|---|---|---|---|---|---|
|
Trains are separated into classes based on what they are carrying, service type, their consist, whether they are limited to a certain speed, etc. This information is important to signallers for determining the priority of trains and applying necessary regulations. Each class is assigned a unique number, with lower numbers generally having higher priority. Trains are separated into classes as follows:
|
| 7.4 - Routing and Regulating Procedures |
|---|
|
In accordance with the QS handbook, trains should be regulated by their headcode then lateness but this is not a hard requirement, and signallers should use their own judgement when prioritising train to be as efficient as possible. It might make more sense to send a Class 2 that has been waiting for a really long time rather than a Class 1 that has just entered your area or just arrived at the platform. Lateness is subjective and depends on how long that train has been waiting in your area. If for example, at Dovedale Central there were two train standing on the platform with the same headcode, however one has been waiting for almost 5 minutes while the others has pressed TRTS, it makes more sense to send the late train first. Routing should be done as soon as the train enters the area or Is Line Clear has been given to adjacent box, unless impossible to be done due to other traffic. When able, the signaller of the box in rear will try to describe the train to you, usually via telephone. But if this is impossible, you must use alternative methods such as Dovedale Live Map or asking the driver for the route. Trains going to DC or DE via Cosdale Harbour should use the CH destination then change their destination while they are there as a stopgap method until a more advanced routing system is released. |
Additional Resources
| 8.1 - Charts |
|---|
|
See the Charts and System Map pages for layouts of each box's signalling area, and of the overall game. |
| 8.2 - Related Videos |
|---|
|
Some of the systems mentioned are used in real life around the world. Here are some examples and explainer videos. British Rail Signalling Guide (UK) A full explanatory video of how a token exchange works in real life. (Singapore) A full explanatory video of the entire token exchange system. (India) |
| 8.3 - Related Pages |
|---|
| 8.4 - Qualified Signaller Handbook |
|---|
|
The handbook details further information such as detailed procedures, extra roleplay notes and regulations specific to Qualified Signallers. You can find the Qualified Signaller Handbook here. |


