More actions
replace more sections with the template |
Bloxbear89 (talk | contribs) removed comment markup preventing top image from displaying |
||
| (13 intermediate revisions by 4 users not shown) | |||
| Line 6: | Line 6: | ||
IMPORTANT!! | IMPORTANT!! | ||
Read the Wiki Guidelines and Style Guide before editing. Failure to do so can result in moderation!--><span class="SignallingGuideToasts"> | Read the Wiki Guidelines and Style Guide before editing. Failure to do so can result in moderation!--><span class="SignallingGuideToasts"> | ||
<div class="light"><center> | |||
[[File:signalling guide light.png|800px]] | [[File:signalling guide light.png|800px]] | ||
</center> | </center> | ||
</div | </div> | ||
<div class="dark"> | <div class="dark"> | ||
[[File:signalling guide dark.png|800px|center]] | |||
[[File:signalling guide dark.png|800px]] | |||
</div> | </div> | ||
{{For|the QS Handbook|Qualified Signaller Handbook}} | |||
Signalling is perhaps one of the most important part of the railway, and exists to ensure the safety of people, trains, and the surrounding infrastructure. For the most part, this is ensured by having ''one train, in one section, at one time.'' | Signalling is perhaps one of the most important part of the railway, and exists to ensure the safety of people, trains, and the surrounding infrastructure. For the most part, this is ensured by having ''one train, in one section, at one time.'' | ||
| Line 53: | Line 52: | ||
}} | }} | ||
== Signal Box Equipment== | == Signal Box Equipment== | ||
{| | |||
| | {{GuideSection | ||
|border_color=crimson | |||
| | |section_id=2.1 | ||
|section_title=Lever Frame | |||
|content= | |||
[[File:Lever_Diagram_Thing.png|right|frameless|434x434px]]The lever frame is perhaps the most important part of the signal box, controlling all of the infrastructure in the surrounding area. Each lever is accompanied by: | |||
*A name plate with the lever's number, which allows you to see what it controls at a glance. | *A name plate with the lever's number, which allows you to see what it controls at a glance. | ||
| Line 69: | Line 70: | ||
Levers are coloured to help you identify their function at a glance. Please note, in some cases these differ from real life standards. The colours currently in use are as follows: | Levers are coloured to help you identify their function at a glance. Please note, in some cases these differ from real life standards. The colours currently in use are as follows: | ||
{ | <!-- the pipe characters in the table are escaped since it is inside a template parameter declaration --> | ||
{{{!}} class="mw-collapsible mw-collapsed wikitable" | |||
!'''Colour''' | !'''Colour''' | ||
! '''Description''' | ! '''Description''' | ||
!'''Locations''' | !'''Locations''' | ||
{{!}}- | |||
{{!}}<span style="color: red;;">'''Red'''</span> | |||
{{!}}Control main stop/home signals. When the lever is normal, the signal is in the danger state. | |||
{{!}}All | |||
{{!}}- | |||
{{!}}<span style="color: yellow;">'''Yellow'''</span> | |||
{{!}}Control distant signals. When the lever is normal, the signal is in the warning state. | |||
{{!}}All | |||
{{!}}- | |||
{{!}} <span style="color: purple;">'''Purple'''</span> | |||
{{!}}Control shunt signals. When the lever is normal, the signal is in the horizontal danger state. Differs from real life standards where they are coloured red. | |||
{{!}} All | |||
{{!}}- | |||
{{!}}<span style="color: #00FFFF;">'''Blue'''</span> | |||
{{!}}Controls facing point locks. When the lever is normal, points are locked and cannot be changed. Before you allow a facing move over the points, they must be locked with this lever. | |||
{{!}}All | |||
{{!}}- | |||
{{!}}<span style="color: #000000;">'''Black'''</span> | |||
{{!}}Controls points. When normal, the points are in the normal position shown on the signal box diagram. Cannot be moved unless the corresponding blue (Facing point lock) is disengaged. | |||
{{!}}All | |||
{{!}}- | |||
{{!}}<span style="color: #00FF00;">'''Green'''</span> | |||
{{!}}Provides an electrical release to a ground frame. When normal, the ground frame is locked and cannot be used. | |||
{{!}}[[Dovedale East Signalling Centre|Dovedale East]] (SLS), [[Satus Signal Box|Satus Services]] (sidings) | |||
{{!}}- | |||
{{!}}<span style="color: brown;">'''Brown'''</span> | |||
{{!}}Controls interlocking in a signal box. When the lever is normal, all other levers are locked. | |||
{{!}}[[Dovedale Central Signal Box]] | |||
{{!}}- | |||
{{!}}<span style="color: white;">'''White'''</span> | |||
{{!}}Spare levers. These do not control anything and are not in use | |||
| | {{!}}[[Masonfield Signal Box|Masonfield]], [[Dovedale East Signalling Centre|Dovedale East]] | ||
{{!}}} | |||
}} | |||
{{GuideSection | {{GuideSection | ||
| Line 156: | Line 158: | ||
|section_title=Track Circuits | |section_title=Track Circuits | ||
|content= | |content= | ||
[[File : Track Circuit_example.png | 500px | center]] | [[File : Track Circuit_example.png | 500px|center]] | ||
In all [[List of Signal Boxes|signal boxes]] aside from [[Benyhone Loop Signal Box]], the map contains either red dots or lines that will light up. This shows the location of trains without the signaller having to look for them. This is particularly useful in signal boxes that lack line of sight with certain areas. When a train is shown to have passed a signal, it means you should pull the lever for that signal. | In all [[List of Signal Boxes|signal boxes]] aside from [[Benyhone Loop Signal Box]], the map contains either red dots or lines that will light up. This shows the location of trains without the signaller having to look for them. This is particularly useful in signal boxes that lack line of sight with certain areas. When a train is shown to have passed a signal, it means you should pull the lever for that signal. | ||
}} | }} | ||
| Line 180: | Line 182: | ||
==Absolute Block Signalling == | ==Absolute Block Signalling == | ||
{| | |||
| | {{GuideSection | ||
|border_color=#e09f00 | |||
| | |section_id=3.1 | ||
|section_title=The Principles of Absolute Block | |||
|content= | |||
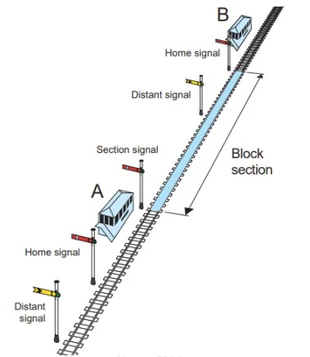
[[File:Block Section Diagram.jpg|right|frameless|357x357px]]Absolute Block splits the sections between signal boxes into block sections. A block section expands from the last stop signal of one signal box, to the first signal of the next signal box. Only one train is allowed within each block section at one time. | |||
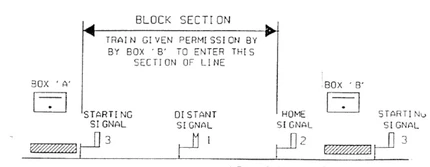
Before a train can enter a block section, the next signal box must give permission for a train to approach. Signallers do this through the use of block instruments and bell signals. | Before a train can enter a block section, the next signal box must give permission for a train to approach. Signallers do this through the use of block instruments and bell signals. | ||
[[File:Block Section Diagram 2.jpg|frameless|430x430px]] | [[File:Block Section Diagram 2.jpg|frameless|430x430px]] | ||
}} | |||
{| | |||
| | {{GuideSection | ||
|border_color=#e09f00 | |||
| | |section_id=3.2 | ||
|section_title=Block Instruments | |||
|content= | |||
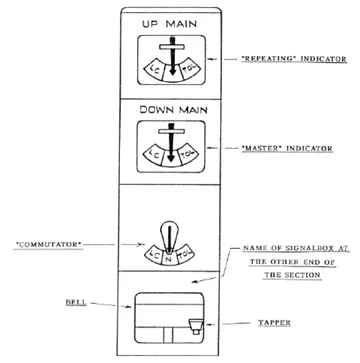
[[File:Block Instrument Diagram.png|right|frameless|363x363px]]Block instruments provide a continuous reminder of the state of the section between two signal boxes. To the right is a diagram of a standard BR "penguin" block instrument. (its colours reasonable one!) From top to bottom, all block instruments consist of: | |||
*A repeater indicator, controlled by the next signal box, which shows the state of the line towards the next signal box. | *A repeater indicator, controlled by the next signal box, which shows the state of the line towards the next signal box. | ||
| Line 209: | Line 215: | ||
When a block instrument is used over a single line, the sending signal box '''must''' keep their commutator at '''normal'''. | When a block instrument is used over a single line, the sending signal box '''must''' keep their commutator at '''normal'''. | ||
}} | |||
{| | |||
| | {{GuideSection | ||
|border_color=#e09f00 | |||
| | |section_id=3.3 | ||
|section_title=Bell Signals | |||
|content= | |||
Bell signals are used to communicate between signal boxes, and are still used today in lieu of telephone communications. Bell codes have distinct advantages over verbal communication, namely: | Bell signals are used to communicate between signal boxes, and are still used today in lieu of telephone communications. Bell codes have distinct advantages over verbal communication, namely: | ||
| Line 233: | Line 240: | ||
In most boxes, there is more than 1 bell. To differentiate the difference between those, you can click on the metal bell itself to hear the sound. This will not notify the other signaller. | In most boxes, there is more than 1 bell. To differentiate the difference between those, you can click on the metal bell itself to hear the sound. This will not notify the other signaller. | ||
}} | |||
{| | {{GuideSection | ||
| | |border_color=#e09f00 | ||
|section_id=3.4 | |||
| | |section_title=Procedure: Offering & Sending Trains | ||
|content= | |||
[[File:Block_Section_Diagram_2.jpg|right|frameless|430x430px]]This section outlines the procedure for the day to day sending of trains between signal boxes. | [[File:Block_Section_Diagram_2.jpg|right|frameless|430x430px]]This section outlines the procedure for the day to day sending of trains between signal boxes. | ||
| Line 266: | Line 273: | ||
#When the has completely left the block section (most often visually confirmed by seeing the tail lamp), you must send '''call attention''' (1) to signaller B. | #When the has completely left the block section (most often visually confirmed by seeing the tail lamp), you must send '''call attention''' (1) to signaller B. | ||
#You must then send '''train out of section''' (2-1) to signaller B, and place your commutator to normal. | #You must then send '''train out of section''' (2-1) to signaller B, and place your commutator to normal. | ||
}} | |||
{| | |||
| | {{GuideSection | ||
|border_color = #e09f00 | |||
| | |section_id = 3.5 | ||
|section_title = Procedure: Opening, Closing & Testing | |||
=== Opening a Signal Box === | |content = === Opening a Signal Box === | ||
When you open your signal box you must send opening of signal box to all surrounding signal boxes. | When you open your signal box you must send opening of signal box to all surrounding signal boxes. | ||
| Line 292: | Line 299: | ||
#Send '''call attention''' (1) and await acknowledgement. | #Send '''call attention''' (1) and await acknowledgement. | ||
# Send '''testing equipment''' (16) and await acknowledgement. | # Send '''testing equipment''' (16) and await acknowledgement. | ||
#Turn your block instrument's commutator through the full sequence of indications (line clear - train on line - normal). You must wait until you receive 1 beat on the bell before moving each indicator. | #Turn your block instrument's commutator through the full sequence of indications (line clear - train on line - normal). You must wait until you receive 1 beat on the bell before moving each indicator. | ||
#The next signal box will then move their block instrument through the full sequence. You must acknowledge all movements with 1 beat on the bell. Before acknowledging the first movement of the block instrument to line clear, pull your starting signal (or one of your starting signals if there are multiple). | |||
====== Electric Token Block Procedure ====== | ====== Electric Token Block Procedure ====== | ||
# Send '''call attention''' (1) and await acknowledgement. | # Send '''call attention''' (1) and await acknowledgement. | ||
# Send testing equipment (16), also make sure to have the token in the slot. | # Send '''testing equipment''' (16), also make sure to have the token in the slot. | ||
# The next signal box will hold the bell down for you to release your token. | # The next signal box will hold the bell down for you to release your token. | ||
# Once you have your token pull your starter signal and replace it (if there | # Once you have your token, pull your starter signal and replace it (if there are multiple starter signals, then just test one of them). | ||
# After you have done this hold the bell down till the next signal box has removed the token | # After you have done this, hold the bell down till the next signal box has removed the token. | ||
# Once they have completed the process they will bell 16 back to you | # Once they have completed the process, they will bell 16 back to you. | ||
}} | |||
{| | |||
| | {{GuideSection | ||
|border_color=#e09f00 | |||
| | |section_id=3.6 | ||
|section_title=Procedure: Shunt Into Forward Section | |||
|content= | |||
This regulation must be used when a train needs to pass your last stop signal into the block section for shunting purposes. | |||
When sending shunt into forward section, you must: | When sending shunt into forward section, you must: | ||
| Line 323: | Line 332: | ||
#When you receive '''train entering section''' (2), acknowledge it and place your block instrument at train on line. | #When you receive '''train entering section''' (2), acknowledge it and place your block instrument at train on line. | ||
#When you receive '''shunt withdrawn''' (8), acknowledge it and place your block instrument to normal. | #When you receive '''shunt withdrawn''' (8), acknowledge it and place your block instrument to normal. | ||
}} | |||
{| | |||
| | {{GuideSection | ||
|border_color=#e09f00 | |||
| | |section_id=3.7 | ||
|section_title=Procedure: Blocking Back | |||
|content= | |||
This regulation must be used when you must send a train on the wrong direction for shunting purposes. If you're shunting train on the right direction, see ''shunt into forward section.'' | This regulation must be used when you must send a train on the wrong direction for shunting purposes. If you're shunting train on the right direction, see ''shunt into forward section.'' | ||
| Line 348: | Line 358: | ||
On a single line, you must use ''shunting train into forward section'' instead of blocking back. | On a single line, you must use ''shunting train into forward section'' instead of blocking back. | ||
}} | |||
{| | |||
| | {{GuideSection | ||
|border_color=#e09f00 | |||
| | |section_id=3.8 | ||
|section_title=Procedure: Cancelling & Train Incorrectly Described | |||
|content= | |||
=== Cancelling === | === Cancelling === | ||
If a train is not going to proceed but you have already sent is line clear or train entering section, you must: | If a train is not going to proceed but you have already sent is line clear or train entering section, you must: | ||
| Line 369: | Line 380: | ||
If you receive '''train incorrectly described (5-3)''', you must acknowledge it and then acknowledge the correct is line clear. Do not move the commutator on the block instrument. | If you receive '''train incorrectly described (5-3)''', you must acknowledge it and then acknowledge the correct is line clear. Do not move the commutator on the block instrument. | ||
}} | |||
{| | |||
| | {{GuideSection | ||
|border_color=#e09f00 | |||
| | |section_id=3.9 | ||
|section_title=Procedure: Obstruction Danger | |||
|content= | |||
=== When to Send === | === When to Send === | ||
You must send obstruction danger if you need to stop trains coming towards your signal box due to an obstruction or other emergency within the block section. You must immediately, and without sending call attention, send '''obstruction danger''' (6) to all relevant signal boxes. | You must send obstruction danger if you need to stop trains coming towards your signal box due to an obstruction or other emergency within the block section. You must immediately, and without sending call attention, send '''obstruction danger''' (6) to all relevant signal boxes. | ||
| Line 419: | Line 431: | ||
However, if there is a train in section you must not send '''obstruction removed''' until that train is clear of the section. | However, if there is a train in section you must not send '''obstruction removed''' until that train is clear of the section. | ||
}} | |||
{| | |||
| | {{GuideSection | ||
|border_color=#e09f00 | |||
| | |section_id=3.10 | ||
|section_title=Procedure: Train or Vehicles Proceeding Without Authority | |||
|content= | |||
=== Train or vehicles proceeding without authority in the right direction (4-5-5) === | === Train or vehicles proceeding without authority in the right direction (4-5-5) === | ||
| Line 431: | Line 444: | ||
* Stop any train travelling on the opposite line if you consider this to be necessary. | * Stop any train travelling on the opposite line if you consider this to be necessary. | ||
* If possible, alter points to divert trains and prevent collisions. | * If possible, alter points to divert trains and prevent collisions. | ||
* Place or keep signals at danger against the train | * Place or keep signals at danger against the train and any other train that could be put at danger. | ||
* If possible, arrange for the line on which the train is proceeding without authority to be cleared. | * If possible, arrange for the line on which the train is proceeding without authority to be cleared. | ||
* Take the necessary action for any level crossings. | * Take the necessary action for any level crossings. | ||
| Line 441: | Line 454: | ||
* Stop any train travelling on the opposite line if you consider this to be necessary. | * Stop any train travelling on the opposite line if you consider this to be necessary. | ||
* If possible, alter points to divert trains and prevent collisions. | * If possible, alter points to divert trains and prevent collisions. | ||
* Place or keep signals at danger against the train | * Place or keep signals at danger against the train and any other train that could be put at danger. | ||
* If possible, arrange for the line on which the train is proceeding without authority to be cleared. | * If possible, arrange for the line on which the train is proceeding without authority to be cleared. | ||
* Take the necessary action for any level crossings. | * Take the necessary action for any level crossings. | ||
| Line 458: | Line 471: | ||
* Place or keep the block instrument at train on line. | * Place or keep the block instrument at train on line. | ||
* If possible, alter points to divert trains and prevent collisions. | * If possible, alter points to divert trains and prevent collisions. | ||
* Place or keep signals at danger against the train | * Place or keep signals at danger against the train and any other train that could be put at danger. | ||
* If possible, arrange for the line on which the train is proceeding without authority to be cleared. | * If possible, arrange for the line on which the train is proceeding without authority to be cleared. | ||
* Take the necessary action for any level crossings. | * Take the necessary action for any level crossings. | ||
| Line 471: | Line 484: | ||
* Take any other possible action to reduce the risk of a collision. | * Take any other possible action to reduce the risk of a collision. | ||
* If necessary, send train or vehicles proceeding without authority in the right/wrong direction to the next signal box. | * If necessary, send train or vehicles proceeding without authority in the right/wrong direction to the next signal box. | ||
}} | |||
==Electric Token Block Signalling== | ==Electric Token Block Signalling== | ||
{| | |||
| | {{GuideSection | ||
|border_color=brown | |||
| | |section_id=4.1 | ||
|section_title=Tokens and Occupation Keys | |||
|content= | |||
[[File:Tyer's No.9 Diagram.png|right|alt=Diagram of Tyer's No.9 Token Instrument|frameless|235x235px]] | [[File:Tyer's No.9 Diagram.png|right|alt=Diagram of Tyer's No.9 Token Instrument|frameless|235x235px]] | ||
On the line between [[Benyhone Loop Signal Box]] and [[Fanory Mill Signal Box]], the Electric Token Block regulations are used to signal trains. Like the Absolute Block regulations seen above, the main principle of the system is to have ''one train, in one section, at one time.'' ETB, however, is fundamentally different in that drivers must be in possession of an object, known as a token, to proceed onto the single line block section. | On the line between [[Benyhone Loop Signal Box]] and [[Fanory Mill Signal Box]], the Electric Token Block regulations are used to signal trains. Like the Absolute Block regulations seen above, the main principle of the system is to have ''one train, in one section, at one time.'' ETB, however, is fundamentally different in that drivers must be in possession of an object, known as a token, to proceed onto the single line block section. | ||
| Line 494: | Line 508: | ||
*When offering a train, you may only take a token whilst it is being released by the box in advance's last beat. | *When offering a train, you may only take a token whilst it is being released by the box in advance's last beat. | ||
*Note that the token '''must''' pass through the instrument before being given to another driver. | *Note that the token '''must''' pass through the instrument before being given to another driver. | ||
}} | |||
==Operating Signals == | ==Operating Signals == | ||
| Line 503: | Line 516: | ||
|section_id=5.1 | |section_id=5.1 | ||
|section_title=Clearing and Replacing Signals | |section_title=Clearing and Replacing Signals | ||
|content= | |content==== '''Clearing Stop Signals''' === | ||
=== '''Clearing Stop Signals''' === | |||
Before clearing a stop signal, you must ensure that: | Before clearing a stop signal, you must ensure that: | ||
| Line 515: | Line 527: | ||
=== '''Replacing Stop Signals''' === | === '''Replacing Stop Signals''' === | ||
You must replace a stop signal to danger as soon as | You must replace a stop signal to danger as soon as the last vehicle has '''passed''' the signal, and it has passed over all points facing to the movement. | ||
=== Clearing Distant Signals === | === Clearing Distant Signals === | ||
| Line 521: | Line 533: | ||
=== '''Replacing Distant Signals''' === | === '''Replacing Distant Signals''' === | ||
You must replace a distant signal to caution as soon as | You must replace a distant signal to caution as soon as the train has '''passed''' the signal. | ||
=== '''Clearing Shunt Signals''' === | === '''Clearing Shunt Signals''' === | ||
You should always attempt to clear all shunt signals required for the movement before allowing the driver to proceed. If you cannot clear all shunt signals, and you need to stop the train at an intermediate shunt signal, you should first advise the driver. | You should always attempt to clear all shunt signals required for the movement before allowing the driver to proceed. If you cannot clear all shunt signals, and you need to stop the train at an intermediate shunt signal, you should first advise the driver. | ||
}} | }} | ||
| Line 579: | Line 591: | ||
* Stop any train travelling on the opposite line if you consider this to be necessary. | * Stop any train travelling on the opposite line if you consider this to be necessary. | ||
* If possible, alter points to divert trains and prevent collisions. | * If possible, alter points to divert trains and prevent collisions. | ||
* Place or keep signals at danger against the train | * Place or keep signals at danger against the train and any other train that could be put at danger. | ||
* If possible, arrange for the line on which the train is proceeding without authority to be cleared. | * If possible, arrange for the line on which the train is proceeding without authority to be cleared. | ||
* Take the necessary action for any level crossings. | * Take the necessary action for any level crossings. | ||
| Line 611: | Line 623: | ||
* [[Signs]] | * [[Signs]] | ||
* [[Phones]] | * [[Phones]] | ||
* [[Qualified Signaller Handbook]] | |||
}} | }} | ||
| Line 631: | Line 630: | ||
<references /> | <references /> | ||
[[Category:Guides]] | [[Category:Guides]] | ||
{{GuidesNavplate}} | |||
Latest revision as of 09:09, 8 January 2025
Signalling is perhaps one of the most important part of the railway, and exists to ensure the safety of people, trains, and the surrounding infrastructure. For the most part, this is ensured by having one train, in one section, at one time.
This guide will cover most of what you need to start signalling in Dovedale, however beforehand it is essential that you have read the Signals and Signs pages so you have sufficient knowledge of topics that are covered in this guide.
An Introduction to Signalling
| 1.1 - The History |
|---|
|
Railways in a modern sense started in 1830 with the Liverpool and Manchester Railway. At first there was little need for signals or signalling; trains were rare and travelled at low speeds. That being said, by the 1840s, a number of accidents occurred, which prompted the introduction of the first railway signalling systems. The first major innovation was time interval working, and was introduced to prevent accidents on the railway alongside fixed signals or hand signallers. The principles of the operation were:
Whilst this was an improvement on the old regime, time interval working was fatally flawed. If a train broke down or came across an obstruction, the next train could crash into it. Prompted again by more accidents, it became clear that a space interval rather than a time interval was required, and thus by the 1850s, the foundation of all modern signalling - absolute block - was created. |
| 1.2 - The Basics: Block Signalling |
|---|
|
Block signalling is the first principle of all modern signalling systems, the general principle being that there should only be one train, in one section, at one time, with few exceptions. Absolute block came as a result of incidents in the time interval system in the 1850s. It was made mandatory for all railways in 1889 and forms the basis of all modern railway signalling. In fact, there are still many signal boxes working under this methodology today. In principle:
|
Signal Box Equipment
| 2.1 - Lever Frame | |||||||||||||||||||||||||||
|---|---|---|---|---|---|---|---|---|---|---|---|---|---|---|---|---|---|---|---|---|---|---|---|---|---|---|---|
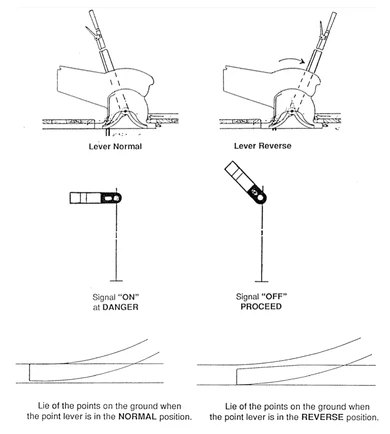
Each lever is coloured, representative of what it controls. A list of all colours in the game are in section 2.2 below - please note these differ from real life standards in some places. When a lever is in the frame/pointing away from you, it is referred to as being in the "normal" position. If a lever is out of the frame/pointed towards you, it is in the "reverse" position. Levers are coloured to help you identify their function at a glance. Please note, in some cases these differ from real life standards. The colours currently in use are as follows:
|
| 2.2 - Route Relay Interlocking System |
|---|
|
At Marigot Crossing Signal Box, there is a not a lever frame, but a signalling panel in use, which is referred to as a route relay interlocking system. The route relay interlocking system is broadly based off of the principles of the eNtry eXit (NX) panel. Mobile users cannot use this feature at the moment. In order to use the system, you must:
Routes will not set if the next signal is already cleared. For example, if you try to set a route from 13 to 14 while 14 has a route set from it, it will not clear 13. In order to cancel a route, you can right click the button by the signal you wish to reset. Once a route is set, white lights will illuminate the route set. These lights will change colour to red when a train occupies the section. All actions are logged and can be viewed on the display boards above the panel. 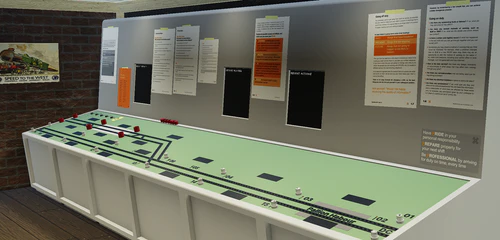 |
| 2.4 - Terminus Indicator |
|---|
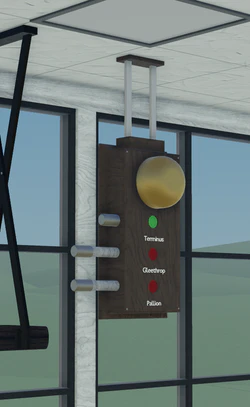 Between Dovedale Central and Dovedale East, there are terminus indicators, aimed to reduce congestion. These tell the signaller ahead where to route the next train, either towards Gleethrop End, towards Pallion Harbour or for terminating at Dovedale Central. The signaller at Dovedale East is expected to communicate with trains and set the indicator by pressing the small bars at the side of the corresponding system. A 'green' circle indicated that that is where the train should be routed towards. When the status of the destination indicator is changed, its bell will ring to notify the other side. |
| 2.5 - Track Circuits |
|---|
 In all signal boxes aside from Benyhone Loop Signal Box, the map contains either red dots or lines that will light up. This shows the location of trains without the signaller having to look for them. This is particularly useful in signal boxes that lack line of sight with certain areas. When a train is shown to have passed a signal, it means you should pull the lever for that signal. |
| 2.6 - Barrier Pedestals & Gate Wheels |
|---|
|
In most signal boxes, level crossings are operated by a barrier pedestal. The barrier pedestal has a switch in the middle, allowing you to switch between the "raise" and "lower" position. Before you can clear any signals over the crossing, you must:
After all trains have passed and it is safe to do so, you should raise the barriers. Marigot Crossing Signal Box is fitted with a gate wheel. The same procedure should be followed, however the gates are operated through the "R" and "F" keys on your keyboard.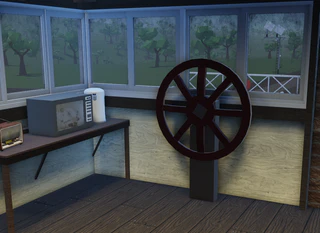 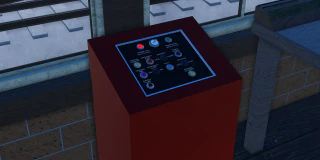 |
Absolute Block Signalling
| 3.3 - Bell Signals |
|---|
|
Bell signals are used to communicate between signal boxes, and are still used today in lieu of telephone communications. Bell codes have distinct advantages over verbal communication, namely:
A full list of bell codes can be found within all signal boxes, however a list of some commonly found ones can be found on the bell codes page. You must acknowledge all bell signals by repeating them. You must not consider any bell signal as understood until it has been correctly acknowledged. You must send call attention (1) and have it acknowledged before you send any other bell signal, except for:
In most boxes, there is more than 1 bell. To differentiate the difference between those, you can click on the metal bell itself to hear the sound. This will not notify the other signaller. |
| 3.5 - Procedure: Opening, Closing & Testing |
|---|
Opening a Signal BoxWhen you open your signal box you must send opening of signal box to all surrounding signal boxes.
Closing a Signal BoxWhen you close your signal box you must:
Testing EquipmentAs soon as possible after opening, if no trains are immediately due to be signalled, you must test your bells and block indicators. Absolute Block Procedure
Electric Token Block Procedure
|
| 3.6 - Procedure: Shunt Into Forward Section |
|---|
|
This regulation must be used when a train needs to pass your last stop signal into the block section for shunting purposes. When sending shunt into forward section, you must:
If you receive shunt into forward section you must:
|
| 3.7 - Procedure: Blocking Back |
|---|
|
This regulation must be used when you must send a train on the wrong direction for shunting purposes. If you're shunting train on the right direction, see shunt into forward section. If you are intending to send Blocking Back, you must:
When you are receiving Blocking Back, you must:
You must not acknowledge blocking back if you have allowed a movement toward the sending signal box which would conflict with the shunting movement at the sending signal box. On a single line, you must use shunting train into forward section instead of blocking back. |
| 3.8 - Procedure: Cancelling & Train Incorrectly Described |
|---|
CancellingIf a train is not going to proceed but you have already sent is line clear or train entering section, you must:
If you receive cancelling (3-5) you must acknowledge it and place your commutator to normal. Train Incorrectly DescribedIf you have sent the incorrect line clear and the signal box in advance has acknowledged it, you must:
If you receive train incorrectly described (5-3), you must acknowledge it and then acknowledge the correct is line clear. Do not move the commutator on the block instrument. |
| 3.9 - Procedure: Obstruction Danger |
|---|
When to SendYou must send obstruction danger if you need to stop trains coming towards your signal box due to an obstruction or other emergency within the block section. You must immediately, and without sending call attention, send obstruction danger (6) to all relevant signal boxes. You must send obstruction danger even if you have not received is line clear or train entering section. You must also send obstruction danger if a train is approaching which you have not:
You do not need to send obstruction danger if you can move facing points to a line that is clear. Sending Obstruction DangerWhen sending obstruction danger (6) you must:
You must then tell all relevant signallers the reason for sending obstruction danger. You must then reach a clear understanding of the lines affected and which can be re-opened for trains. If you receive train or vehicles proceeding without authority in the right direction (4-5-5) after sending obstruction danger, you must take all possible actions to stop the approaching train. If you receive cancelling for a train which has been acknowledged before you sent obstruction danger, you must acknowledge it but keep the block instrument at train on line. Receiving Obstruction DangerIf you receive obstruction danger (6) you must:
If no train has been signalled towards the sending signal box, you must acknowledge obstruction danger. If you cannot stop a train heading towards the signal box, or there is already a train in section, you must not acknowledge obstruction danger and immediately send train or vehicles proceeding without authority in the right direction. If you succeed in stopping a train, you must then acknowledge obstruction danger and send cancelling. You must then find out why obstruction danger was sent, and reach a clear understanding of the lines that remain blocked and which can be re-opened for trains. Obstruction RemovedWhen the obstruction has been removed, or if a train can pass clear of the obstruction, you must send call attention followed by obstruction removed (2-1-2) and place your block instrument to normal. However, if there is a train in section you must not send obstruction removed until that train is clear of the section. |
| 3.10 - Procedure: Train or Vehicles Proceeding Without Authority |
|---|
Train or vehicles proceeding without authority in the right direction (4-5-5)If a train or vehicle proceeds without authority in the right direction, you must:
If you receive train or vehicle proceeds without authority in the right direction, you must:
If there is already a train in section, you must:
If there is no train in section you must send train out of section and signal the next train as normal. Train or vehicles proceeding without authority in the wrong direction (2-5-5)If a train or vehicle proceeds without authority in the wrong direction, you must:
If you receive train or vehicle proceeds without authority in the wrong direction, you must:
|
Electric Token Block Signalling
| 4.1 - Tokens and Occupation Keys |
|---|
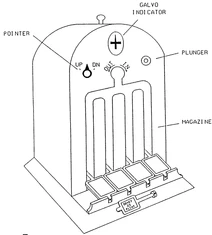 On the line between Benyhone Loop Signal Box and Fanory Mill Signal Box, the Electric Token Block regulations are used to signal trains. Like the Absolute Block regulations seen above, the main principle of the system is to have one train, in one section, at one time. ETB, however, is fundamentally different in that drivers must be in possession of an object, known as a token, to proceed onto the single line block section. Both boxes make use of a Tyer's No.9 Key Token Instrument. These consist of:
When signalling a train using the token instruments, the same procedures must be followed as the absolute block system mentioned above in section 3.1, however:
|
Operating Signals
| 5.1 - Clearing and Replacing Signals |
|---|
Clearing Stop SignalsBefore clearing a stop signal, you must ensure that:
Where the next stop signal is at danger, you must not clear a signal that cannot display a caution aspect until the train is nearly at a stand. This is to ensure that the driver's speed is controlled to stop at the next signal. Replacing Stop SignalsYou must replace a stop signal to danger as soon as the last vehicle has passed the signal, and it has passed over all points facing to the movement. Clearing Distant SignalsBefore clearing a distant signal, you must ensure that all stop signals until the next distant signal or until the end of the section are set to clear. Replacing Distant SignalsYou must replace a distant signal to caution as soon as the train has passed the signal. Clearing Shunt SignalsYou should always attempt to clear all shunt signals required for the movement before allowing the driver to proceed. If you cannot clear all shunt signals, and you need to stop the train at an intermediate shunt signal, you should first advise the driver. |
| 5.2 - Passing Signals at Danger |
|---|
|
Before authorising a driver to pass a signal at danger, you must ensure that:
When passing a signal at danger, you must reach a clear understanding with the driver as to what move will occur. You must tell the driver:
You may then provide verbal authority to pass the signal, or provide a yellow handsignal. |
| 5.3 - Making Unsignalled Moves |
|---|
|
Before making an unsignalled move, you must ensure that:
You must reach a clear understanding with the driver as to what move will occur. You must then either:
|
| 5.4 - Signal Passed at Danger |
|---|
|
If a train has passed a signal at danger, or you have been made aware of a train heading towards your signal box without authority, you must:
|
Additional Resources
| 6.1 - Charts |
|---|
|
See the Charts page and the System Map for guides and maps on the game respectively. |
| 6.2 - Related Video |
|---|
|
The following video may be useful for those willing to learn more on the topic. |
| 6.3 - Related Pages |
|---|
References
