More actions
Bloxbear89 (talk | contribs) Added new WIP section 2.2 to chapter 2 |
Bloxbear89 (talk | contribs) another fix |
||
| (10 intermediate revisions by 2 users not shown) | |||
| Line 5: | Line 5: | ||
IMPORTANT!! | IMPORTANT!! | ||
Read the Wiki Guidelines and Style Guide before editing. Failure to do so can result in moderation!--> | Read the Wiki Guidelines and Style Guide before editing. Failure to do so can result in moderation!--> | ||
[[File:signalling guide light.png|800px]] | {{For|the current (Pre V2.0) Signalling Guide|Signalling Guide}} | ||
{{Draft}} | |||
{{LastEdit}} | |||
<div class="light"> | |||
[[File:signalling guide light.png|800px|center]] | |||
</center> | </center> | ||
</div> | </div> | ||
<div class="dark"> | <div class="dark"> | ||
[[File:signalling guide dark.png|800px|center]] | [[File:signalling guide dark.png|800px|center]] | ||
</div> | </div> | ||
Signalling is one of the most important parts of the railway and the game. It exists to ensure the safety of people, trains, and the surrounding infrastructure. For the most part, this is ensured by having ''one train, in one section, at one time.'' | Signalling is one of the most important parts of the railway and the game. It exists to ensure the safety of people, trains, and the surrounding infrastructure. For the most part, this is ensured by having ''one train, in one section, at one time.'' | ||
This guide will cover | This guide will cover the majority of information needed to learn signalling in Dovedale. Beforehand it is essential that you have read the [[Signals]] and [[Signs]] pages so that you have sufficient knowledge of topics that are covered in this guide. | ||
== An Introduction to Signalling == | == An Introduction to Signalling == | ||
| Line 61: | Line 65: | ||
|section_title=Lever Frame | |section_title=Lever Frame | ||
|content= | |content= | ||
[[File:Lever_Diagram_Thing.png| | [[File:Lever_Diagram_Thing.png|center|frameless|434x434px]] | ||
===Introduction=== | |||
The lever frame is perhaps the most important part of a mechanical [[List of Signal Boxes|signal box]], controlling most of the signalling infrastructure in the surrounding area. Attached to each lever is a plate with the lever's number, description, and a list of the other levers which must be reversed prior to reversing the lever. | |||
When a lever is in the frame/pointing away from you, it is referred to as being in the "normal" position. If a lever is out of the frame/pointing towards you, it is in the "reversed" position. | When a lever is in the frame/pointing away from you, it is referred to as being in the "normal" position. If a lever is out of the frame/pointing towards you, it is in the "reversed" position. | ||
| Line 67: | Line 74: | ||
Some levers have shortened handles. For signal levers, this indicates that a mechanically operated signal has been replaced with an electrically operated semaphore or colour light signal. For white/blue FPL levers, this indicates that the FPL has been motorised and disconnected from the lever, but the lever still operates the interlocking mechanism and must be used as if it were a functional FPL. | Some levers have shortened handles. For signal levers, this indicates that a mechanically operated signal has been replaced with an electrically operated semaphore or colour light signal. For white/blue FPL levers, this indicates that the FPL has been motorised and disconnected from the lever, but the lever still operates the interlocking mechanism and must be used as if it were a functional FPL. | ||
===Lever Colouring=== | |||
Levers are coloured to help you identify their function at a glance. A white stripe in the centre of a signal lever indicates that it is electronically released by another signal box. Please note, in some cases these differ from real life standards. The colours currently in use are as follows: | Levers are coloured to help you identify their function at a glance. A white stripe in the centre of a signal lever indicates that it is electronically released by another signal box. Please note, in some cases these differ from real life standards. The colours currently in use are as follows: | ||
<!-- the pipe characters in the table are escaped since it is inside a template parameter declaration --> | <!-- the pipe characters in the table are escaped since it is inside a template parameter declaration --> | ||
{{{!}} class="mw-collapsible | {{{!}} class="mw-collapsible wikitable" | ||
!'''Colour''' | !'''Colour''' | ||
! '''Description''' | ! '''Description''' | ||
| Line 106: | Line 114: | ||
|border_color=crimson | |border_color=crimson | ||
|section_id=2.2 | |section_id=2.2 | ||
|section_title=Block Shelf | |||
|content= | |||
IMAGE PLACEHOLDER | |||
The block shelf is positioned directly above the lever frame and serves as a mounting point for signalling equipment to be easily seen and worked by a signaller. It is named such as the block instruments and bells used by Absolute Block and Tokenless Block is mounted here. (See 3.2, 5.2) Equipment mounted to the block shelf includes: | |||
* Block Indicators and Bells (AB and TLB) | |||
* Electrical Release Plungers | |||
* Line Clear Release Indicators | |||
* Signal and Points Indicators | |||
* Track Circuit and Depression Bar Indicators | |||
}} | |||
{{GuideSection | |||
|border_color=crimson | |||
|section_id=2.3 | |||
|section_title=Track Layout Diagrams | |section_title=Track Layout Diagrams | ||
|content= | |content= | ||
Every signal box contains a large diagram displaying the layout of tracks controlled by the box and information. | Every signal box contains a large diagram displaying the layout of tracks controlled by the box and information. | ||
WIP | WIP | ||
IMAGE PLACEHOLDER | |||
}} | }} | ||
| Line 117: | Line 143: | ||
{{GuideSection | {{GuideSection | ||
|border_color=crimson | |border_color=crimson | ||
|section_id=2. | |section_id=2.4 | ||
|section_title=Electrical Release Plungers | |section_title=Electrical Release Plungers & Line Clear Indicators | ||
|content= | |content= | ||
Some signal levers have an electric lock plunger connected to them; you will need to press the plunger with the corresponding number before pulling the lever. You do not need to press the plunger to move the lever back to the normal position. | '''Electrical Release Plungers''' | ||
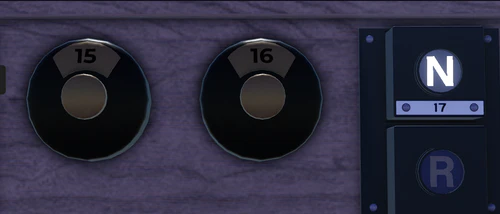
Some signal levers have an electric lock plunger connected to them; you will need to press the plunger with the corresponding number before pulling the lever. You do not need to press the plunger to move the lever back to the normal position. Plungers are installed for signals under the following circumstances: | |||
*Section signal requiring line clear release | |||
*Signal protecting a level crossing | |||
*Signal with several routes | |||
*Subsidiary signal interlocked with track circuit | |||
[[File:Electric Plunger.png|500px|center]] | [[File:Electric Plunger.png|500px|center]] | ||
'''Line Clear Indicators''' | |||
These indicators light up when the corresponding block instrument displays 'Line Clear' (Absolute block) or 'Train accepted' (Tokenless Block). They are installed if section signals requiring line clear release are located far from the corresponding block instrument, such that a signaller is informed when line clear has been given by the other box, allowing them to clear their section signal. | |||
[[File:Line Clear Indicator.png|150px|center]] | |||
}} | }} | ||
{{GuideSection | {{GuideSection | ||
|border_color=crimson | |border_color=crimson | ||
|section_id=2. | |section_id=2.5 | ||
|section_title=Signal and Points Indicators | |section_title=Signal and Points Indicators | ||
|content= | |content= | ||
[[File:V2.0signal&pointsindicators.png| | [[File:V2.0signal&pointsindicators.png|750px|center]] | ||
All signal boxes contain indicators which display the aspect/position of each signal and set of points controlled by the signal box. This allows the signaller to ensure that signals and points are in the correct position after moving a lever. Some signals are not provided with indicators as they are in direct sight of the signaller. | All signal boxes contain indicators which display the aspect/position of each signal and set of points controlled by the signal box. This allows the signaller to ensure that signals and points are in the correct position after moving a lever. Some signals are not provided with indicators as they are in direct sight of the signaller. | ||
| Line 143: | Line 183: | ||
{{GuideSection | {{GuideSection | ||
|border_color=crimson | |border_color=crimson | ||
|section_id=2. | |section_id=2.6 | ||
|section_title=Track Circuits | |section_title=Track Circuits | ||
|content= | |content= | ||
[[File : MS track circuits.png | | [[File : MS track circuits.png | 750px|center]] | ||
In all signal boxes aside from [[Benyhone Loop Signal Box]], the track layout diagram includes numerous pairs of lights, which show the location of trains without the signaller having to look for them. This is particularly useful in signal boxes that lack line of sight with certain areas, as signallers can tell which signals a train a has passed. | In all signal boxes aside from [[Benyhone Loop Signal Box]], the track layout diagram includes numerous pairs of lights, which show the location of trains without the signaller having to look for them. This is particularly useful in signal boxes that lack line of sight with certain areas, as signallers can tell which signals a train a has passed. | ||
Aside from being located on the | Aside from being located on the diagram, some track circuit indicators may be attached to or placed on the block shelf, named with the pertaining location or line. An example of one style can be seen below. | ||
[[File:Track circuit new.png|500px|center]] | [[File:Track circuit new.png|500px|center]] | ||
| Line 157: | Line 196: | ||
{{GuideSection | {{GuideSection | ||
|border_color=crimson | |border_color=crimson | ||
|section_id=2. | |section_id=2.7 | ||
|section_title=Barrier Pedestals & Gate Wheels | |section_title=Barrier Pedestals & Gate Wheels | ||
|content= | |content= | ||
| Line 175: | Line 214: | ||
[[Marigot Crossing Signal Box]] is fitted with a gate wheel. The same procedure should be followed, however the gates are operated through the "R" and "F" keys on your keyboard, and the "Gate Stops" and "Gate Locks" levers must both be normal to move the gates. | [[Marigot Crossing Signal Box]] is fitted with a gate wheel. The same procedure should be followed, however the gates are operated through the "R" and "F" keys on your keyboard, and the "Gate Stops" and "Gate Locks" levers must both be normal to move the gates. | ||
[[File:V2.0 barrier pedestal.png|left| | [[File:V2.0 barrier pedestal.png|left|300px]] | ||
[[File:V2.0_Gate_Wheel.png|right| | [[File:V2.0_Gate_Wheel.png|right|300px]] | ||
}} | |||
{{GuideSection | |||
|border_color=crimson | |||
|section_id=2.8 | |||
|section_title=WIP | |||
|content= | |||
WIP | |||
IMAGE PLACEHOLDER | |||
}} | }} | ||
| Line 225: | Line 274: | ||
*'''Speed''' - Bell signals are often faster than typing or speaking messages. | *'''Speed''' - Bell signals are often faster than typing or speaking messages. | ||
A list of commonly used bell codes can be found within all signal boxes, however complete list can be found on the [[Bell Codes|bell codes]] page. | A list of commonly used bell codes can be found within all signal boxes, however a complete list can be found on the [[Bell Codes|bell codes]] page. | ||
You '''must''' acknowledge all bell signals by repeating them. You must not consider any bell signal as understood until it has been correctly acknowledged. | You '''must''' acknowledge all bell signals by repeating them. You must not consider any bell signal as understood until it has been correctly acknowledged. | ||
| Line 549: | Line 598: | ||
*Press offer, then wait for the indicator to turn to "Train Accepted". | *Press offer, then wait for the indicator to turn to "Train Accepted". | ||
*Once accepted, you now can clear the section signal. | *Once accepted, you now can clear the section signal. | ||
After offering, you should inform the signaller at the adjacent box of the train headcode. An example script could be: | |||
"Hello, Satus Signaller. Is the line clear for train 2F05? (Or Two Foxtrot Zero Five, to avoid filter.)", "Line is clear for train 2F05.", "Thank you." | |||
If you are unable to accept, then you should say: | |||
"No, train 2F05 refused." | |||
Note that you can also do this while the train is still offering, or even after the train was accepted. | |||
For ease of operation, Dovedale's TB Instruments have sounds in them that can be used as alerts similar to bell codes in other block instruments. If the accepting box's acceptance lever is not set to accepting, it will make a bell sound alerting them. Once their acceptance lever has been changed to accepting, the box that offered a train will be notified with a bell. | For ease of operation, Dovedale's TB Instruments have sounds in them that can be used as alerts similar to bell codes in other block instruments. If the accepting box's acceptance lever is not set to accepting, it will make a bell sound alerting them. Once their acceptance lever has been changed to accepting, the box that offered a train will be notified with a bell. | ||
| Line 596: | Line 653: | ||
|border_color=lightblue | |border_color=lightblue | ||
|section_id=6.2 | |section_id=6.2 | ||
|section_title= | |section_title=Authorising Signals to be Passed at Danger | ||
|content= | |content= | ||
Before authorising a driver to pass a signal at danger, you must ensure that: | Before authorising a driver to pass a signal at danger, you must ensure that: | ||
| Line 638: | Line 695: | ||
|border_color=lightblue | |border_color=lightblue | ||
|section_id=6.4 | |section_id=6.4 | ||
|section_title=Signal Passed at Danger | |section_title=Signal Passed at Danger Without Authority (SPAD) | ||
|content= | |content= | ||
If a train has passed a signal at danger, or you have been made aware of a train heading towards your signal box without authority, you must: | If a train has passed a signal at danger, or you have been made aware of a train heading towards your signal box without authority, you must: | ||
| Line 649: | Line 706: | ||
* Take the necessary action for any level crossings. | * Take the necessary action for any level crossings. | ||
* Take any other possible action to reduce the risk of a collision. | * Take any other possible action to reduce the risk of a collision. | ||
}} | |||
==Routing Trains== | |||
{{GuideSection | |||
|border_color=#8a2af7 | |||
|section_id=7.1 | |||
|section_title=History | |||
|content=WIP | |||
}} | |||
{{GuideSection | |||
|border_color=#8a2af7 | |||
|section_id=7.2 | |||
|section_title=Train Classifications | |||
|content=Trains are separated into classes based on what they are carrying, service type, their consist, whether they are limited to a certain speed, etc. This information is important to signallers for determining the priority of trains and applying necessary regulations. Each class is assigned a unique number, with lower numbers generally having higher priority. Trains are separated into classes as follows: | |||
{{{!}} class="wikitable" | |||
{{!}}+ | |||
!Headcode | |||
!Train Class | |||
{{!}}- | |||
{{!}}1 | |||
{{!}}Express passenger train | |||
Nominated postals or parcels train | |||
Breakdown train or snow plough train going to clear the line (1Z99) | |||
Traction unit going to assist failed train (1Z99) | |||
{{!}}- | |||
{{!}}2 | |||
{{!}}Ordinary passenger train | |||
Officers special train (2Z01) | |||
Test train (2Qxx) | |||
{{!}}- | |||
{{!}}3 | |||
{{!}}Freight train if specially authorized | |||
A parcels train | |||
An autumn-railhead treatment train | |||
Empty coaching stock train if specially authorized | |||
{{!}}- | |||
{{!}}4 | |||
{{!}}Freight train that can run up to 75mph (120km/h) | |||
{{!}}- | |||
{{!}}5 | |||
{{!}}Empty coaching stock train | |||
{{!}}- | |||
{{!}}6 | |||
{{!}}Freight train that can run up to 60mph (95km/h) | |||
{{!}}- | |||
{{!}}7 | |||
{{!}}Freight train that can run up to 45mph (70km/h) | |||
{{!}}- | |||
{{!}}8 | |||
{{!}}Freight train that can run up to 30mph (55km/h) | |||
{{!}}- | |||
{{!}}9 | |||
{{!}}Class 373 | |||
Other passenger train if specially authorized | |||
{{!}}- | |||
{{!}}0 | |||
{{!}}Light engine | |||
{{!}}} | |||
}} | |||
{{GuideSection | |||
|border_color=#8a2af7 | |||
|section_id=7.3 | |||
|section_title=Headcodes | |||
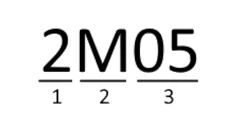
|content=[[File:headcode.png|right|alt=Headcode of 2M05|frameless|235x235px]] | |||
A headcode is a unique 4 character code used to identify one train from another. Headcodes have 3 parts, as shown in the picture on the right: | |||
# The first part is the train classification (see 7.2). For this example headcode, the number 2 means this train is an ordinary passenger train. | |||
# The second part is a letter used to indicate the train's destination. For this headcode, the letter M means the train is heading to Masonfield. | |||
# The third part is two randomly generated numbers used to distinguish between specific trains running the same service. Note that there is currently no system to prevent two trains from sharing the same headcode, although this is very unlikely to occur. | |||
}} | |||
{{GuideSection | |||
|border_color=#8a2af7 | |||
|section_id=7.4 | |||
|section_title=Routing Procedures | |||
|content=WIP | |||
}} | }} | ||
| Line 655: | Line 793: | ||
{{GuideSection | {{GuideSection | ||
|border_color=#f0a1e1 | |border_color=#f0a1e1 | ||
|section_id= | |section_id=8.1 | ||
|section_title=Charts | |section_title=Charts | ||
|content=See the [[Charts]] and [[Map|System Map]] pages for layouts of each box's signalling area, and of the overall game. | |content=See the [[Charts]] and [[Map|System Map]] pages for layouts of each box's signalling area, and of the overall game. | ||
| Line 662: | Line 800: | ||
{{GuideSection | {{GuideSection | ||
|border_color=#f0a1e1 | |border_color=#f0a1e1 | ||
|section_id= | |section_id=8.2 | ||
|section_title=Related Videos | |section_title=Related Videos | ||
|content= | |content= | ||
| Line 676: | Line 814: | ||
{{GuideSection | {{GuideSection | ||
|border_color=#f0a1e1 | |border_color=#f0a1e1 | ||
|section_id= | |section_id=8.3 | ||
|section_title=Related Pages | |section_title=Related Pages | ||
|content= | |content= | ||
| Line 687: | Line 825: | ||
{{GuideSection | {{GuideSection | ||
|border_color=#f0a1e1 | |border_color=#f0a1e1 | ||
|section_id= | |section_id=8.4 | ||
|section_title=Qualified Signaller Handbook | |section_title=Qualified Signaller Handbook | ||
|content=The handbook details further information such as detailed procedures, extra roleplay notes and regulations specific to Qualified Signallers. You can find the Qualified Signaller Handbook [[Qualified_Signaller_Handbook|here]]. | |content=The handbook details further information such as detailed procedures, extra roleplay notes and regulations specific to Qualified Signallers. You can find the Qualified Signaller Handbook [[Qualified_Signaller_Handbook|here]]. | ||
Latest revision as of 11:29, 16 January 2025
Signalling is one of the most important parts of the railway and the game. It exists to ensure the safety of people, trains, and the surrounding infrastructure. For the most part, this is ensured by having one train, in one section, at one time.
This guide will cover the majority of information needed to learn signalling in Dovedale. Beforehand it is essential that you have read the Signals and Signs pages so that you have sufficient knowledge of topics that are covered in this guide.
An Introduction to Signalling
| 1.1 - The History |
|---|
|
Railways in a modern sense started in 1830 with the Liverpool and Manchester Railway. At first there was little need for signals or signalling; trains were rare and travelled at low speeds. However, by the 1840s, a number of accidents occurred, which prompted the introduction of the first railway signalling systems. The first major innovation was time interval working, and was introduced to prevent accidents on the railway alongside fixed signals or hand signallers. The principles of this operation were:
Whilst this was an improvement on the old regime, time interval working was fatally flawed. If a train broke down or came across an obstruction, the next train could crash into it. Prompted again by more accidents, it became clear that a space interval rather than a time interval was required, and thus by the 1850s, the foundation of all modern signalling - Absolute block - was created. |
| 1.2 - The Basics: Block Signalling |
|---|
|
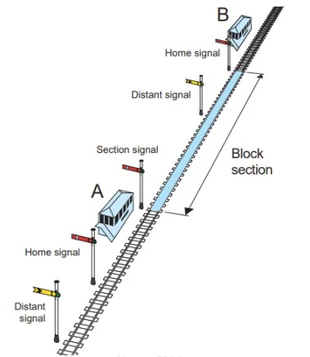
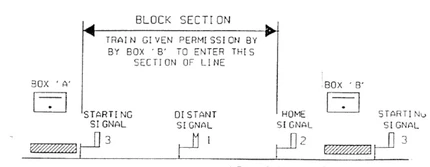
Block signalling is the first principle of all modern signalling systems; the general principle being that there should only be one train, in one section, at one time, with few exceptions. Absolute block came as a result of incidents in the time interval system in the 1850s. It was made mandatory for all railways in 1889 and forms the basis of all modern railway signalling. In fact, there are still many signal boxes working under this methodology today. In principle:
|
Signal Box Equipment
| 2.1 - Lever Frame | ||||||||||||||||||||
|---|---|---|---|---|---|---|---|---|---|---|---|---|---|---|---|---|---|---|---|---|
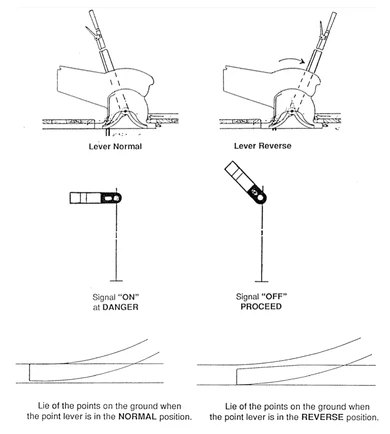 IntroductionThe lever frame is perhaps the most important part of a mechanical signal box, controlling most of the signalling infrastructure in the surrounding area. Attached to each lever is a plate with the lever's number, description, and a list of the other levers which must be reversed prior to reversing the lever. When a lever is in the frame/pointing away from you, it is referred to as being in the "normal" position. If a lever is out of the frame/pointing towards you, it is in the "reversed" position. Some levers have shortened handles. For signal levers, this indicates that a mechanically operated signal has been replaced with an electrically operated semaphore or colour light signal. For white/blue FPL levers, this indicates that the FPL has been motorised and disconnected from the lever, but the lever still operates the interlocking mechanism and must be used as if it were a functional FPL. Lever ColouringLevers are coloured to help you identify their function at a glance. A white stripe in the centre of a signal lever indicates that it is electronically released by another signal box. Please note, in some cases these differ from real life standards. The colours currently in use are as follows:
|
| 2.2 - Block Shelf |
|---|
|
IMAGE PLACEHOLDER The block shelf is positioned directly above the lever frame and serves as a mounting point for signalling equipment to be easily seen and worked by a signaller. It is named such as the block instruments and bells used by Absolute Block and Tokenless Block is mounted here. (See 3.2, 5.2) Equipment mounted to the block shelf includes:
|
| 2.3 - Track Layout Diagrams |
|---|
|
Every signal box contains a large diagram displaying the layout of tracks controlled by the box and information. WIP IMAGE PLACEHOLDER |
| 2.6 - Track Circuits |
|---|
 In all signal boxes aside from Benyhone Loop Signal Box, the track layout diagram includes numerous pairs of lights, which show the location of trains without the signaller having to look for them. This is particularly useful in signal boxes that lack line of sight with certain areas, as signallers can tell which signals a train a has passed. Aside from being located on the diagram, some track circuit indicators may be attached to or placed on the block shelf, named with the pertaining location or line. An example of one style can be seen below. 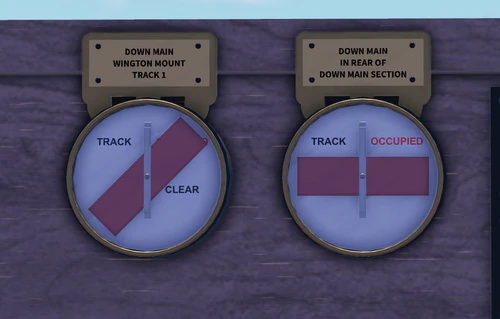 |
| 2.7 - Barrier Pedestals & Gate Wheels |
|---|
|
In most signal boxes, manually controlled level crossings are operated by a barrier pedestal. The barrier pedestal has two interactable buttons: "Barriers Lower" and "Barriers Raise". Some crossings have "On-call" functionality; these can be kept down until a road user presses a plunger which activates an annunciator on the level crossing control. You then may raise the level crossing. After 3-5 minutes or when needed, the level crossing can then be lowered. Before you can clear any signals over the crossing, you must:
After all trains have passed and it is safe to do so, you should raise the barriers. Marigot Crossing Signal Box is fitted with a gate wheel. The same procedure should be followed, however the gates are operated through the "R" and "F" keys on your keyboard, and the "Gate Stops" and "Gate Locks" levers must both be normal to move the gates. 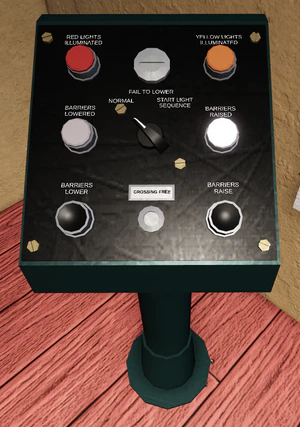 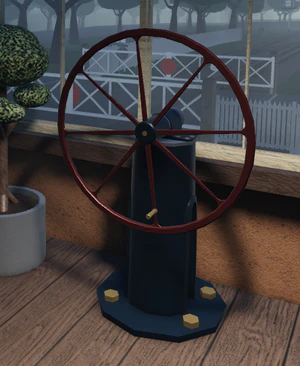 |
| 2.8 - WIP |
|---|
|
WIP IMAGE PLACEHOLDER |
Absolute Block Signalling
| 3.3 - Bell Signals |
|---|
|
Bell signals are used to communicate between signal boxes, and are still used today in lieu of telephone communications. Bell codes have distinct advantages over verbal communication, namely:
A list of commonly used bell codes can be found within all signal boxes, however a complete list can be found on the bell codes page. You must acknowledge all bell signals by repeating them. You must not consider any bell signal as understood until it has been correctly acknowledged. You must send call attention (1) and have it acknowledged before you send any other bell signal, except for:
In most boxes, there is more than 1 bell. To differentiate between each bell, you can click on the metal bell itself to hear the sound. This will not send a signal to the other signal box, and can only be heard by your player. A small light is also provided which will illuminate when a signal is received. |
| 3.5 - Procedure: Opening, Closing & Testing |
|---|
Opening a Signal BoxWhen you open your signal box you must send opening of signal box to all surrounding signal boxes.
Closing a Signal BoxWhen you close your signal box you must:
Testing EquipmentAs soon as possible after opening, if no trains are immediately due to be signalled, you must test your bells and block indicators. Absolute Block Procedure
Electric Token Block Procedure
|
| 3.6 - Procedure: Shunt Into Forward Section |
|---|
|
This regulation must be used when a train needs to pass your last stop signal into the block section for shunting purposes. When sending shunt into forward section, you must:
If you receive shunt into forward section you must:
|
| 3.7 - Procedure: Blocking Back |
|---|
|
This regulation must be used when you must send a train on the wrong direction for shunting purposes. If you're shunting train on the right direction, see shunt into forward section. If you are intending to send Blocking Back, you must:
When you are receiving Blocking Back, you must:
You must not acknowledge blocking back if you have allowed a movement toward the sending signal box which would conflict with the shunting movement at the sending signal box. On a single line, you must use shunting train into forward section instead of blocking back. |
| 3.8 - Procedure: Cancelling & Train Incorrectly Described |
|---|
CancellingIf a train is not going to proceed but you have already sent is line clear or train entering section, you must:
If you receive cancelling (3-5) you must acknowledge it and place your commutator to normal. Train Incorrectly DescribedIf you have sent the incorrect line clear and the signal box in advance has acknowledged it, you must:
If you receive train incorrectly described (5-3), you must acknowledge it and then acknowledge the correct is line clear. Do not move the commutator on the block instrument. |
| 3.9 - Procedure: Obstruction Danger |
|---|
When to SendYou must send obstruction danger if you need to stop trains coming towards your signal box due to an obstruction or other emergency within the block section. You must immediately, and without sending call attention, send obstruction danger (6) to all relevant signal boxes. You must send obstruction danger even if you have not received is line clear or train entering section. You must also send obstruction danger if a train is approaching which you have not:
You do not need to send obstruction danger if you can move facing points to a line that is clear. Sending Obstruction DangerWhen sending obstruction danger (6) you must:
You must then tell all relevant signallers the reason for sending obstruction danger. You must then reach a clear understanding of the lines affected and which can be re-opened for trains. If you receive train or vehicles proceeding without authority in the right direction (4-5-5) after sending obstruction danger, you must take all possible actions to stop the approaching train. If you receive cancelling for a train which has been acknowledged before you sent obstruction danger, you must acknowledge it but keep the block instrument at train on line. Receiving Obstruction DangerIf you receive obstruction danger (6) you must:
If no train has been signalled towards the sending signal box, you must acknowledge obstruction danger. If you cannot stop a train heading towards the signal box, or there is already a train in section, you must not acknowledge obstruction danger and immediately send train or vehicles proceeding without authority in the right direction. If you succeed in stopping a train, you must then acknowledge obstruction danger and send cancelling. You must then find out why obstruction danger was sent, and reach a clear understanding of the lines that remain blocked and which can be re-opened for trains. Obstruction RemovedWhen the obstruction has been removed, or if a train can pass clear of the obstruction, you must send call attention followed by obstruction removed (2-1-2) and place your block instrument to normal. However, if there is a train in section you must not send obstruction removed until that train is clear of the section. |
| 3.10 - Procedure: Train or Vehicles Proceeding Without Authority |
|---|
Train or vehicles proceeding without authority in the right direction (4-5-5)If a train or vehicle proceeds without authority in the right direction, you must:
If you receive train or vehicle proceeds without authority in the right direction, you must:
If there is already a train in section, you must:
If there is no train in section you must send train out of section and signal the next train as normal. Train or vehicles proceeding without authority in the wrong direction (2-5-5)If a train or vehicle proceeds without authority in the wrong direction, you must:
If you receive train or vehicle proceeds without authority in the wrong direction, you must:
|
Electric Token Block Signalling
| 4.1 - Tokens and Occupation Keys |
|---|
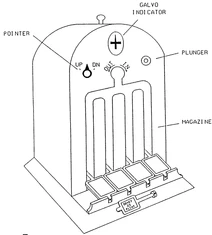 On the line between Benyhone Loop Signal Box and Fanory Mill Signal Box, the Electric Token Block regulations are used to signal trains. Like the Absolute Block regulations seen above, the main principle of the system is to have one train, in one section, at one time. ETB, however, is fundamentally different in that drivers must be in possession of an object, known as a token, to proceed onto the single line block section. Both boxes make use of a Tyer's No.9 Key Token Instrument. These consist of:
When signalling a train using the token instruments, the same procedures must be followed as the absolute block system mentioned above in section 3.1, however:
|
Tokenless Block Signalling
| 5.3 - Tokenless Block - Operation |
|---|
|
Tokenless block operation is largely different compared to other methods of working in game. Bell signals are not needed for this method of working. To offer a train, you must perform the following:
After offering, you should inform the signaller at the adjacent box of the train headcode. An example script could be: "Hello, Satus Signaller. Is the line clear for train 2F05? (Or Two Foxtrot Zero Five, to avoid filter.)", "Line is clear for train 2F05.", "Thank you." If you are unable to accept, then you should say: "No, train 2F05 refused." Note that you can also do this while the train is still offering, or even after the train was accepted. For ease of operation, Dovedale's TB Instruments have sounds in them that can be used as alerts similar to bell codes in other block instruments. If the accepting box's acceptance lever is not set to accepting, it will make a bell sound alerting them. Once their acceptance lever has been changed to accepting, the box that offered a train will be notified with a bell. Once the section signal is cleared and the train has passed it, the train will occupy a track circuit, causing both boxes' TB instruments to move to "Train In Section". When the train arrives at the receiving box it will activate a treadle and two track circuits in succession. (Anything else will cause the system to prevent Train Arrived from being pressed) If the train is complete with a tail lamp, the accepting box will then turn the acceptance lever to normal, before pressing Train Arrived to reset the block instrument to normal. When accepting, simply perform the actions of the accepting signal box above. If the offering box needs to cancel the train, the signaller must ask the accepting box to turn their block instrument to Normal then press Train Arrived to reset it. If the train despawns mid-section, the accepting signal box must turn their block instrument to Normal and press Train Arrived, then notify the offering signal box that the train has despawned. |
Operating Signals
| 6.1 - Clearing and Replacing Signals |
|---|
Clearing Stop SignalsBefore clearing a stop signal, you must ensure that:
Where the next stop signal is at danger, you must not clear a signal that cannot display a caution aspect until the train is nearly at a stand. This is to ensure that the driver's speed is controlled to stop at the next signal. Replacing Stop SignalsYou must replace a stop signal to danger as soon as the last vehicle of the trainset has passed the signal, and it has passed over all points facing to the movement. Clearing Distant SignalsBefore clearing a distant signal, you must ensure that all stop signals until the next distant signal or until the end of the section are set to clear. Replacing Distant SignalsYou must replace a distant signal to caution as soon as the train has passed the signal. Clearing Shunt SignalsYou should always attempt to clear all shunt signals required for the movement before allowing the driver to proceed. If you cannot clear all shunt signals, and you need to stop the train at an intermediate shunt signal, you should first advise the driver. |
| 6.2 - Authorising Signals to be Passed at Danger |
|---|
|
Before authorising a driver to pass a signal at danger, you must ensure that:
When passing a signal at danger, you must reach a clear understanding with the driver as to what move will occur. You must tell the driver:
You may then provide verbal authority to pass the signal, or provide a yellow handsignal. |
| 6.3 - Making Unsignalled Moves |
|---|
|
Before making an unsignalled move, you must ensure that:
You must reach a clear understanding with the driver as to what move will occur. You must then either:
|
| 6.4 - Signal Passed at Danger Without Authority (SPAD) |
|---|
|
If a train has passed a signal at danger, or you have been made aware of a train heading towards your signal box without authority, you must:
|
Routing Trains
| 7.1 - History |
|---|
|
WIP |
| 7.2 - Train Classifications | ||||||||||||||||||||||
|---|---|---|---|---|---|---|---|---|---|---|---|---|---|---|---|---|---|---|---|---|---|---|
|
Trains are separated into classes based on what they are carrying, service type, their consist, whether they are limited to a certain speed, etc. This information is important to signallers for determining the priority of trains and applying necessary regulations. Each class is assigned a unique number, with lower numbers generally having higher priority. Trains are separated into classes as follows:
|
| 7.4 - Routing Procedures |
|---|
|
WIP |
Additional Resources
| 8.1 - Charts |
|---|
|
See the Charts and System Map pages for layouts of each box's signalling area, and of the overall game. |
| 8.2 - Related Videos |
|---|
|
Some of the systems mentioned are used in real life around the world. Here are some examples and explainer videos. British Rail Signalling Guide (UK) A full explanatory video of how a token exchange works in real life. (Singapore) A full explanatory video of the entire token exchange system. (India) |
| 8.3 - Related Pages |
|---|
| 8.4 - Qualified Signaller Handbook |
|---|
|
The handbook details further information such as detailed procedures, extra roleplay notes and regulations specific to Qualified Signallers. You can find the Qualified Signaller Handbook here. |
References
