
More actions
https://dovedale.fandom.com/wiki/$1>Bigbadbob85 No edit summary |
m →Trivia |
||
| (14 intermediate revisions by 7 users not shown) | |||
| Line 1: | Line 1: | ||
{{SignalBox | {{SignalBox | ||
| | |image=Signal Box=DEBox Daytime.png; | ||
Interior=DEBoxInterior.png; | |||
Board=Dovedale East Board.png | |||
|stations_controlled=[[Dovedale East]] | |stations_controlled=[[Dovedale East]] | ||
|crossings_controlled=[[Dovedale East Crossing]] | |crossings_controlled=[[Dovedale East Crossing]] | ||
| | |closest_station=[[Dovedale East]] | ||
|signal_type=[[ | |signal_type=[[Semaphore Signals]] | ||
| | |home_signals_controlled=26 | ||
|distant_signals_controlled=2 | |||
|points_controlled=15 | |||
|shunt_signals_controlled=16 | |||
|xp=2000 XP | |||
|status=in_operation | |||
|abbreviation=DE | |||
}} | |||
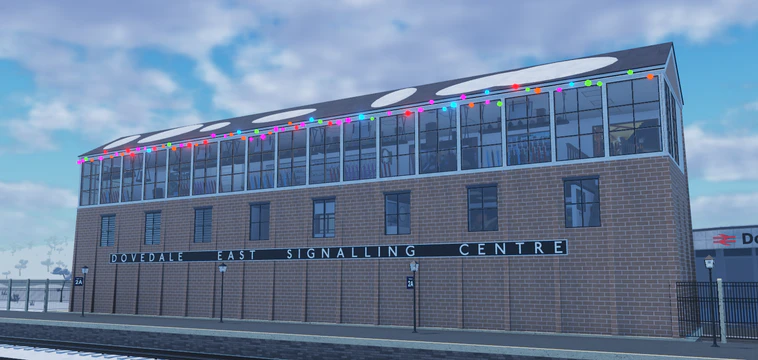
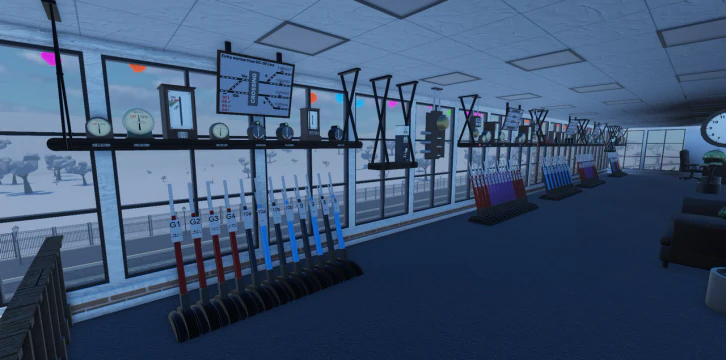
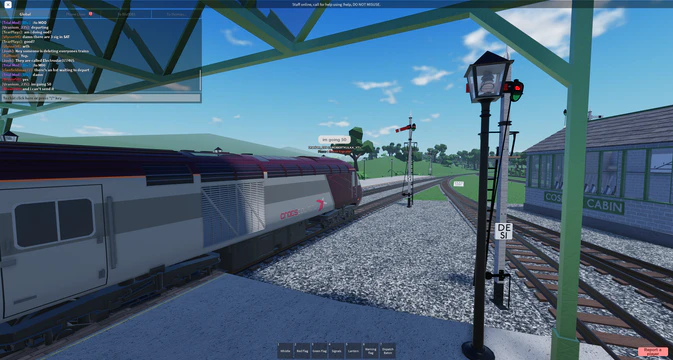
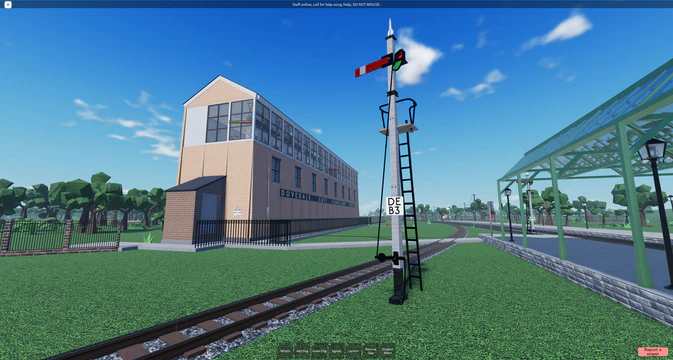
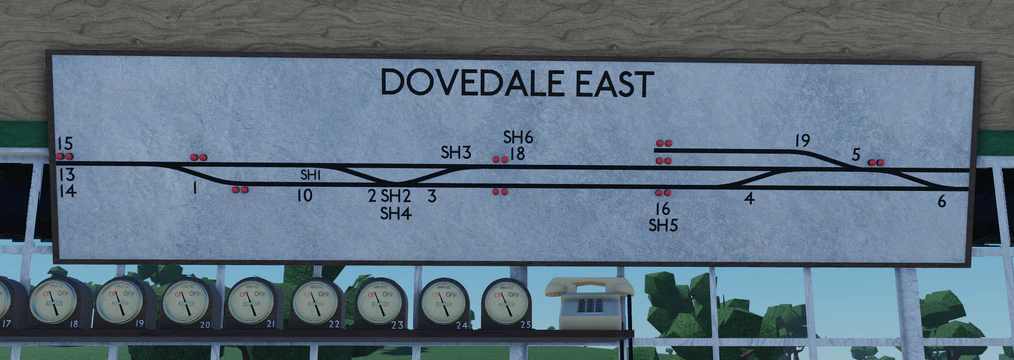
The '''Dovedale East Signalling Centre (DESC)''' is the largest signal box in the game, housing around 26 Stop Semaphore Signals, 2 Distant Semaphore Signals, 16 shunt signals and 15 switches that control the [[Dovedale East]] station. While the [[Cosdale Coal Depot]] is in the area, it is no longer physically connected to the system, thus it is not controlled. | |||
The box will usually see lots of traffic from [[Satus Services]] and [[Dovedale Central]]. Due to the line between Dovedale East and Satus Services only being single-track, trains often have to wait before proceeding to Satus Services. This can sometimes create queues at Dovedale East which often extend as far back as Dovedale Central. | The box will usually see lots of traffic from [[Satus Services]] and [[Dovedale Central]]. Due to the line between Dovedale East and Satus Services only being single-track, trains often have to wait before proceeding to Satus Services. This can sometimes create queues at Dovedale East which often extend as far back as Dovedale Central. | ||
| Line 17: | Line 23: | ||
== Operation == | == Operation == | ||
DESC controls the area between Dovedale Central and the | DESC controls the area between Dovedale Central and the Satus Single line. | ||
=== Platforming === | === Platforming === | ||
All platforms are signalled to be bi-directional. However, with platform 2 it's not recommended to send trains continuing through to Dovedale Central as they would be running on the wrong line. Each platform is its own individual 'Block' Between 2 signals. Permissive Working is technically possible if the person you're signalling knows what they're doing. Express services (Belled as 4) can mostly run through the bypass lines uninterrupted. | All platforms are signalled to be bi-directional. However, with platform 2 it's not recommended to send trains continuing through to Dovedale Central as they would be running on the wrong line. Each platform is its own individual 'Block' Between 2 signals. Permissive Working is technically possible if the person you're signalling knows what they're doing. Express services (Belled as 4) can mostly run through the bypass lines uninterrupted. | ||
=== SPaD Countermeasures === | === SPaD (Signal Passed at Danger) Countermeasures === | ||
While not technically having any trap or catch points, the crossovers Between the Bypass and Platforms can be used to catch SPaDders before they do any real harm. If a train has SPaD at Dovedale Central and they couldn't catch them there, points 10A/B can be used to catch | While not technically having any trap or catch points, the crossovers Between the Bypass and Platforms can be used to catch SPaDders before they do any real harm. If a train has SPaD at Dovedale Central and they couldn't catch them there, points 10A/B can be used to catch the trains. | ||
=== Block Indicators/Bells === | === Block Indicators/Bells === | ||
| Line 30: | Line 36: | ||
== Trivia == | == Trivia == | ||
*Dovedale East Signal Box is statistically rated as the most busiest and most stressful signal box in the game, this is generally due to how chaotic it is trying to deal with all the traffic coming from Satus Services or [[Fanory Mill]], which | *Dovedale East Signal Box is statistically rated as the most busiest and most stressful signal box in the game, this is generally due to how chaotic it is trying to deal with all the traffic coming from Satus Services or [[Fanory Mill]], which includes the [[Class 377]] and the [[Class 43]]. The signallers at this box also have to control the traffic from Dovedale Central, which includes the Class 43, [[Class 158]] and [[Class 156]]. | ||
*In the older versions, cameras were available inside the signalling centre, because track circuits were often defective. | |||
**There were 3 cameras: one placed towards the [[Cosdale Coal Depot|coal depot]], another one for [[Glassbury Junction|Glassbury Junction (DE E1)]], and towards [[Steynbath Halt]] to see incoming trains from Satus Services. | |||
== Gallery == | == Gallery == | ||
<gallery> | <gallery mode="packed-hover"> | ||
File:Dovedale East Signalling Centre Winter.png|Dovedale East Signalling Centre during winter | File:Dovedale East Signalling Centre Winter.png|Dovedale East Signalling Centre during winter | ||
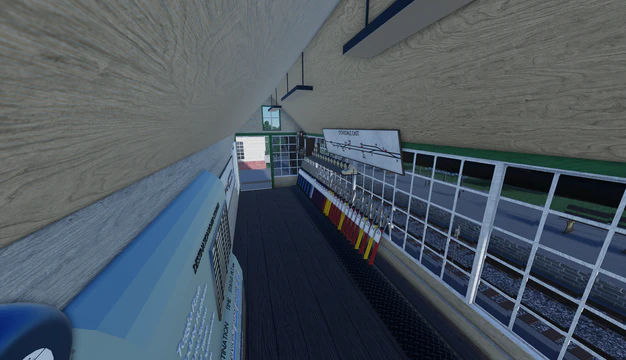
File:DE Box Interior Winter.jpg|The interior of the box during winter | File:DE Box Interior Winter.jpg|The interior of the box during winter | ||
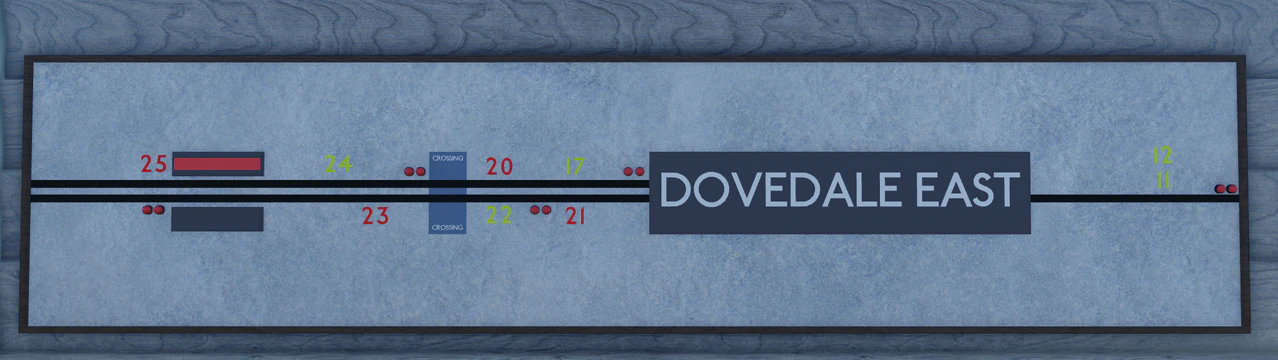
File:Dovedale East Board.png|The board. | |||
</gallery> | </gallery> | ||
=== Old versions === | === Old versions === | ||
<gallery> | <gallery mode="packed-hover"> | ||
File:DE board.png|Old station diagram. | |||
File:Trains at dove east.png|An admin controlled Class 91 and Class 43 at Dovedale East Station. | File:Trains at dove east.png|An admin controlled Class 91 and Class 43 at Dovedale East Station. | ||
File:DE Class 43 Zoomed.png|A Class 43 HST departing Dovedale East Station | File:DE Class 43 Zoomed.png|A Class 43 HST departing Dovedale East Station | ||
| Line 52: | Line 62: | ||
File:Old DE Box2.png|View of the box from the older [[Dovedale East]] station. | File:Old DE Box2.png|View of the box from the older [[Dovedale East]] station. | ||
File:DE Circuit Board.png|Old circuit board. | File:DE Circuit Board.png|Old circuit board. | ||
File:DE Diagram Old.png | File:DE Diagram Old.png|Old station diagram. | ||
</gallery> | </gallery> | ||
{{SignalBoxesNavplate}} | |||
[[Category:Signal Boxes]] | [[Category:Signal Boxes]] | ||
Latest revision as of 06:48, 6 January 2025
Quick Facts:
Dovedale East Signalling Centre


In Operation
Dovedale East Signalling Centre
Signal Box
Station Code
DE
Signal Type
Nearest station
XP Requirement
2,000 XP333.333 min <br />5.556 h <br />
Operations Information
Stations controlled
Crossings controlled
Statistics
Home signals controlled
26
Distant signals controlled
2
Points controlled
15
Shunt signals controlled
16
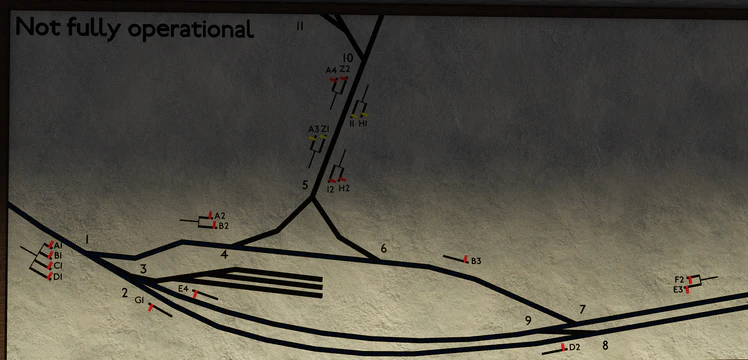
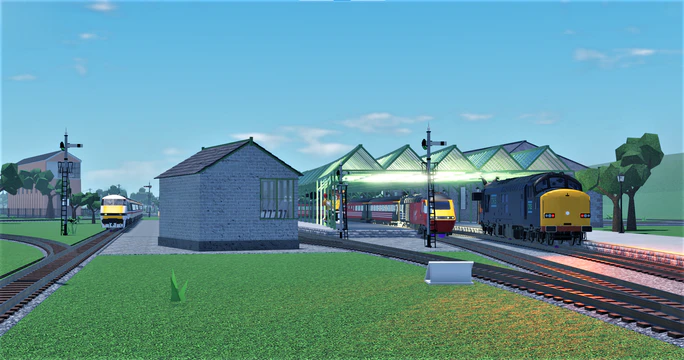
The Dovedale East Signalling Centre (DESC) is the largest signal box in the game, housing around 26 Stop Semaphore Signals, 2 Distant Semaphore Signals, 16 shunt signals and 15 switches that control the Dovedale East station. While the Cosdale Coal Depot is in the area, it is no longer physically connected to the system, thus it is not controlled.
The box will usually see lots of traffic from Satus Services and Dovedale Central. Due to the line between Dovedale East and Satus Services only being single-track, trains often have to wait before proceeding to Satus Services. This can sometimes create queues at Dovedale East which often extend as far back as Dovedale Central.
Charts for the Signal Box can be found on the Charts page.
Operation
DESC controls the area between Dovedale Central and the Satus Single line.
Platforming
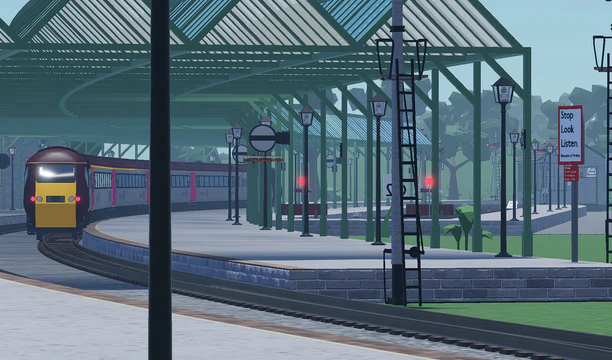
All platforms are signalled to be bi-directional. However, with platform 2 it's not recommended to send trains continuing through to Dovedale Central as they would be running on the wrong line. Each platform is its own individual 'Block' Between 2 signals. Permissive Working is technically possible if the person you're signalling knows what they're doing. Express services (Belled as 4) can mostly run through the bypass lines uninterrupted.
SPaD (Signal Passed at Danger) Countermeasures
While not technically having any trap or catch points, the crossovers Between the Bypass and Platforms can be used to catch SPaDders before they do any real harm. If a train has SPaD at Dovedale Central and they couldn't catch them there, points 10A/B can be used to catch the trains.
Block Indicators/Bells
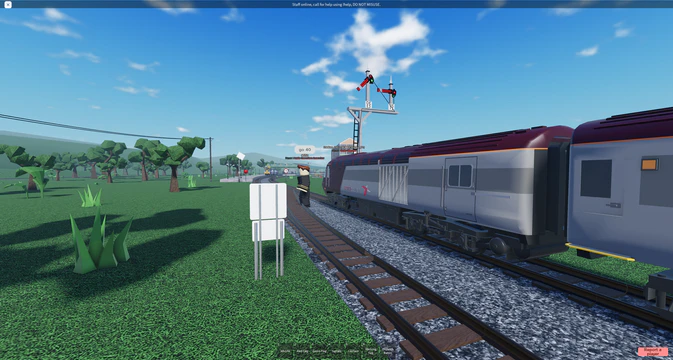
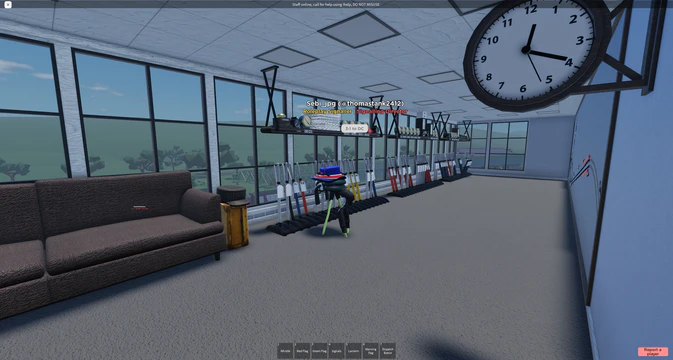
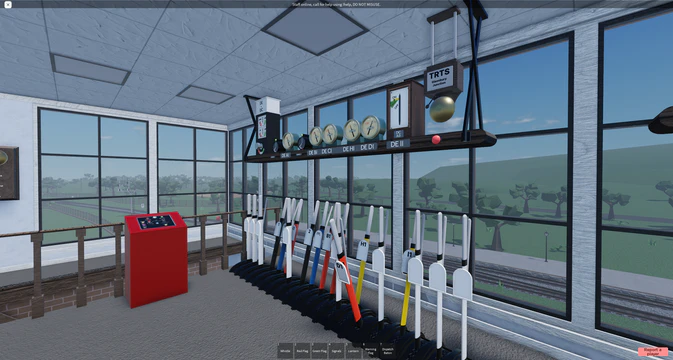
DESC contains a block indicator and bell combo as well as the most detailed track circuits in the game so you can provide a good grasp of detail to the other signallers when they've got trains going to and from Dovedale East.
Trivia
- Dovedale East Signal Box is statistically rated as the most busiest and most stressful signal box in the game, this is generally due to how chaotic it is trying to deal with all the traffic coming from Satus Services or Fanory Mill, which includes the Class 377 and the Class 43. The signallers at this box also have to control the traffic from Dovedale Central, which includes the Class 43, Class 158 and Class 156.
- In the older versions, cameras were available inside the signalling centre, because track circuits were often defective.
- There were 3 cameras: one placed towards the coal depot, another one for Glassbury Junction (DE E1), and towards Steynbath Halt to see incoming trains from Satus Services.
Gallery
-
 Dovedale East Signalling Centre during winter
 -
 The interior of the box during winter
 -
 The board.


Old versions
-
 Old station diagram.
 -
 An admin controlled Class 91 and Class 43 at Dovedale East Station.
 -
 A Class 43 HST departing Dovedale East Station
 -
 A Class 43 HST approaching Dovedale East on the up line towards Status Services.
 -
 A Class 43 HST waiting at danger signal E4 at Dovedale East towards Satus Services.
 -
 A Qualified Signaller at Dovedale East Signalling Centre belling Satus Services Box.
 -
 Levers inside the Dovedale East Signalling Centre that used to operate the entrance to Dovedale East from Satus Services.
 -
 A Semaphore home signal located outside of the Dovedale East Signalling Centre
 -
 A Class 323 waiting at a Semaphore home signal set to 'Danger'.
 -
 Interior of the older box.
 -
 View of the box from the older Dovedale East station.
 -
 Old circuit board.
 -
 Old station diagram.


