More actions
m add info about stop markers that apply to trains turning back |
m Removed some redundant links. |
||
| Line 32: | Line 32: | ||
When a whistle board is placed next to a signal, like in the third image below, drivers shouldn't whistle until the signal has been cleared. | When a whistle board is placed next to a signal, like in the third image below, drivers shouldn't whistle until the signal has been cleared. | ||
<gallery> | <gallery> | ||
File:WhitsleBoard.gif|A round whistle board | File:WhitsleBoard.gif|A round whistle board | ||
File:W WHISTLE sign.png|A triangular whistle board | File:W WHISTLE sign.png|A triangular whistle board near [[Steynbath Crossing]]. | ||
File:DE Level Crossing Sign.png|A Whistle Board placed next to a Level Crossing Ahead Sign and an exit signal at [[Dovedale East]]. | File:DE Level Crossing Sign.png|A Whistle Board placed next to a Level Crossing Ahead Sign and an exit signal at [[Dovedale East]]. | ||
File:Whistle Sign.png|A cut-out whistle sign near [[Jaiden's House]] | File:Whistle Sign.png|A cut-out whistle sign near [[Jaiden's House]] | ||
| Line 43: | Line 43: | ||
A SPAD Trap Indicator board is used to warn drivers about an upcoming SPAD trap. SPAD traps (also called catch/trap points) are used to forcefully protect main lines from trains on sidings that are passing signals at danger. | A SPAD Trap Indicator board is used to warn drivers about an upcoming SPAD trap. SPAD traps (also called catch/trap points) are used to forcefully protect main lines from trains on sidings that are passing signals at danger. | ||
Although there are currently five SPAD traps present in the game (Three at [[Masonfield]] and two at the [[Benyhone Loop]]), none of them are preceded by SPAD Trap Indicators, meaning that these signs are currently not present in the game. | Although there are currently five SPAD traps present in the game (Three at [[Masonfield]] and two at the [[Benyhone Loop]]), none of them are preceded by SPAD Trap Indicators (signs or [https://dovedale.wiki/wiki/Signals#SPAD_Indicator signals]), meaning that these signs are currently not present in the game. | ||
<gallery> | <gallery> | ||
| Line 56: | Line 56: | ||
<gallery> | <gallery> | ||
File:Level Crossing Sign.png|Level Crossing Ahead Sign | File:Level Crossing Sign.png|Level Crossing Ahead Sign | ||
File:DE Level Crossing Sign.png|A Level Crossing Ahead Sign placed next to a whistle board and an exit signal at | File:DE Level Crossing Sign.png|A Level Crossing Ahead Sign placed next to a whistle board and an exit signal at Dovedale East. | ||
</gallery> | </gallery> | ||
== Limit of Shunt Indicator == | == Limit of Shunt Indicator == | ||
A Limit of Shunt Indicator marks the limit that carriages and locomotives are allowed to be shunted. It appears mostly as a white sign with a red label saying 'Limit of Shunt' or 'Shunt Limit'. | A Limit of Shunt Indicator marks the limit that carriages and locomotives are allowed to be shunted. It appears mostly as a white sign with a red label saying 'Limit of Shunt' or 'Shunt Limit'. Those signs can be seen at the end of most stations, but are not present at [[Fanory Mill]]. | ||
<gallery> | <gallery> | ||
File:LOS Sign DE.png|A Limit of Shunt Indicator near | File:LOS Sign DE.png|A Limit of Shunt Indicator near Dovedale East. | ||
File:sat limit of shunt.png|Rusted Shunt Limit Signal | File:sat limit of shunt.png|Rusted Shunt Limit Signal. | ||
</gallery> | </gallery> | ||
| Line 84: | Line 84: | ||
|Special stopping markers for some trains like the [[Class 43|Class 43 (HST)]] and the [[Class 323]] can be found at some stations. These are colored differently and show the train type on the marker. A ''T'' indicates that the stop marker applies to trains turning back. | |Special stopping markers for some trains like the [[Class 43|Class 43 (HST)]] and the [[Class 323]] can be found at some stations. These are colored differently and show the train type on the marker. A ''T'' indicates that the stop marker applies to trains turning back. | ||
|<gallery> | |<gallery> | ||
File:MS Car Stop Markers.png|Stopping marker for turning | File:MS Car Stop Markers.png|Stopping marker for turning Class 43s and trains with 4 cars at [[Masonfield]]. | ||
File:hst s car marker.png|Stopping marker for the | File:hst s car marker.png|Stopping marker for the Class 43 (HST) at [[Fanory Mill]]. | ||
</gallery> | </gallery> | ||
|- | |- | ||
| Line 95: | Line 95: | ||
== Stop Indicator == | == Stop Indicator == | ||
Stop indicators is to tell drivers to immediately stop the train before reaching the sign. They are used to warn drivers about the track ending, like at buffers. | Stop indicators is to tell drivers to immediately stop the train before reaching the sign. They are used to warn drivers about the track ending, like at buffers. | ||
<gallery> | <gallery> | ||
File:STOPNOW Sign.png|Shunt Area Stop Now Sign | File:STOPNOW Sign.png|Shunt Area Stop Now Sign in old [[Satus Services]]. | ||
</gallery> | </gallery> | ||
| Line 108: | Line 108: | ||
This tells passengers, dispatchers, guards and drivers what platform they are standing on. | This tells passengers, dispatchers, guards and drivers what platform they are standing on. | ||
<gallery> | <gallery> | ||
File:Platform Sign DE.png|A sign at | File:Platform Sign DE.png|A sign at Dovedale East showing the platform. | ||
</gallery> | </gallery> | ||
| Line 119: | Line 119: | ||
== Poor Adhesion Site == | == Poor Adhesion Site == | ||
This sign indicates to drivers that due to various factors, there is less 'grip' (adhesion) on the train to the tracks, and they need to be careful. Low adhesion arises from a number of causes, most notably from leaf contamination arising from | This sign indicates to drivers that due to various factors, there is less 'grip' (adhesion) on the train to the tracks, and they need to be careful. Low adhesion arises from a number of causes, most notably from leaf contamination arising from line side vegetation. | ||
<ref> https://www.rail-traction.com/what-is-low-adhesion/ </ref> At the end of the site, there is a sign to indicate that the track is back to normal. | <ref> https://www.rail-traction.com/what-is-low-adhesion/ </ref> At the end of the site, there is a sign to indicate that the track is back to normal. | ||
<gallery> | <gallery> | ||
| Line 136: | Line 136: | ||
[[File:LowClearanceIndicator.png|right|150px]] | [[File:LowClearanceIndicator.png|right|150px]] | ||
When you see this red and white chequered sign, this is to inform potential engineering teams that the next section has limited clearance and they will need to take extra measures to make sure they're not involved with an accident with a train. This can be found at places like between [[Pallion Harbour]] and [[Dovedale Central]] or [[Perthtyne]] where either width clearance or height clearance is low. | When you see this red and white chequered sign, this is to inform potential engineering teams that the next section has limited clearance and they will need to take extra measures to make sure they're not involved with an accident with a train. This can be found at places like between [[Pallion Harbour]] and [[Dovedale Central]] or [[Perthtyne]] where either width clearance or height clearance is low. | ||
== References == | == References == | ||
[[Category:Features]] | [[Category:Features]] | ||
Revision as of 15:23, 6 July 2024
Signs on the railway inform drivers, guards, dispatchers, drivers, and even passengers about what is up ahead, where a place is or what they should do. Below is a list of signs.
Speed Limit Indicators
Speed Limit Indicators informs drivers about upcoming speed limits. The current speed limit is repeated in the driving UI below the current movement speed.
| Type | Explanation | Image |
|---|---|---|
| Permanent Speed Restriction Sign | A white circular sign with a red outline means that the speed limit stated applies to trains after passing the sign. A sign with one or more arrows above a general speed indicator sign indicates that the limit only applies for trains branching off the next point in the stated direction(s). | 
|
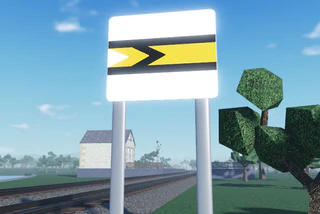
| Advance Warning Indicator | A white triangular-shaped sign with a yellow outline informs drivers about an upcoming speed limit which is lower than the currently enforced one. The sign gives drivers enough time to reduce their train's speed to the new limit after passing this sign. | 
|
| "SLOW" sign | A sign with the words SLOW means that drivers should slow down as soon as possible. |  |
-
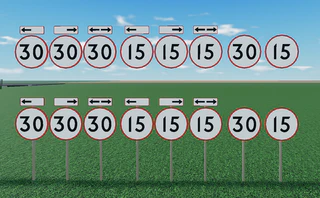 Different speed limits signs.

Whistle Board
The Whistle Board tells train drivers to whistle. It is often placed near level crossings to inform cars, pedestrians and signallers about approaching trains. The sign can be triangular or circular.
When a whistle board is placed next to a signal, like in the third image below, drivers shouldn't whistle until the signal has been cleared.
-
 A round whistle board
 -
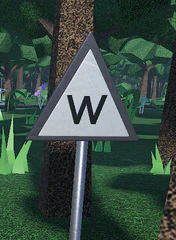 A triangular whistle board near Steynbath Crossing.
 -
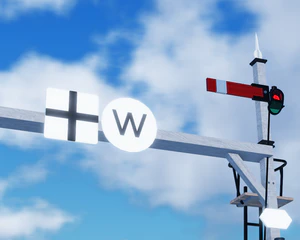 A Whistle Board placed next to a Level Crossing Ahead Sign and an exit signal at Dovedale East.
 -
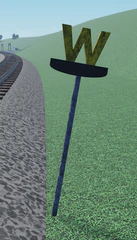 A cut-out whistle sign near Jaiden's House


SPAD Trap Indicator
A SPAD Trap Indicator board is used to warn drivers about an upcoming SPAD trap. SPAD traps (also called catch/trap points) are used to forcefully protect main lines from trains on sidings that are passing signals at danger.
Although there are currently five SPAD traps present in the game (Three at Masonfield and two at the Benyhone Loop), none of them are preceded by SPAD Trap Indicators (signs or signals), meaning that these signs are currently not present in the game.
-
 Something how the SPAD Trap information sign looks like.
 -
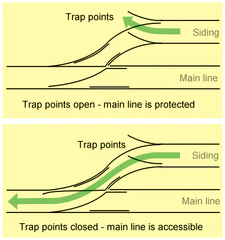 How SPAD traps work


Level Crossing Ahead Sign
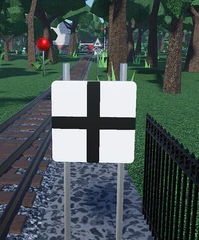
This sign informs drivers of an upcoming level crossing ahead. It can be identified by the black cross on a white background.
While Satus Level Crossing and Dovedale East Crossing have these signs, Marigot Crossing and Narmouth Crossing are not.
-
 Level Crossing Ahead Sign
 -
A Level Crossing Ahead Sign placed next to a whistle board and an exit signal at Dovedale East.

Limit of Shunt Indicator
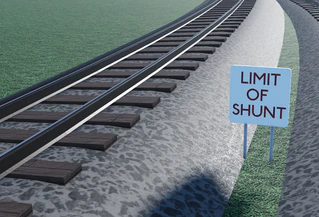
A Limit of Shunt Indicator marks the limit that carriages and locomotives are allowed to be shunted. It appears mostly as a white sign with a red label saying 'Limit of Shunt' or 'Shunt Limit'. Those signs can be seen at the end of most stations, but are not present at Fanory Mill.
-
 A Limit of Shunt Indicator near Dovedale East.
 -
 Rusted Shunt Limit Signal.


Stopping Marker
A stopping marker tells train drivers where to stop at a platform.
| Type | Explanation | Image |
|---|---|---|
| "S" Car Stop Marker | Found at most of the stations in the game, drivers should stop at those stop markers if there is not a specific one for their train type. | 
|
| Class specific stopping marker | Special stopping markers for some trains like the Class 43 (HST) and the Class 323 can be found at some stations. These are colored differently and show the train type on the marker. A T indicates that the stop marker applies to trains turning back. |
|
| Old "S" Car Stop Marker | This version of the "S" Car Stop Marker was used on older stations. | 
|


Stop Indicator
Stop indicators is to tell drivers to immediately stop the train before reaching the sign. They are used to warn drivers about the track ending, like at buffers.
-
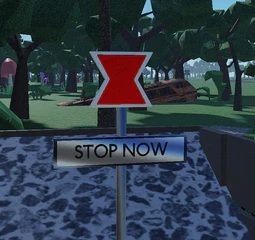 Shunt Area Stop Now Sign in old Satus Services.

Distant Board
Found only on the Dovedale Central turn and between Marigot Crossing and Pallion Harbour, these signs tell drivers to be cautious of the signal ahead as the next signal is around a blind corner and might be in their blind spot if they go too fast. This is a permanent signal and can't be changed.
-
 A Distant Board

Platform Sign
This tells passengers, dispatchers, guards and drivers what platform they are standing on.
-
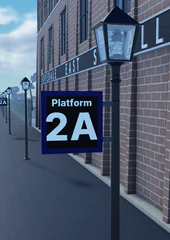 A sign at Dovedale East showing the platform.

Countdown Markers
A Countdown Marker tells drivers that a station or a signal is ahead. They are often placed subsequently to inform drivers about the distance.
-
 A sign denoting that a station is ahead.

Poor Adhesion Site
This sign indicates to drivers that due to various factors, there is less 'grip' (adhesion) on the train to the tracks, and they need to be careful. Low adhesion arises from a number of causes, most notably from leaf contamination arising from line side vegetation. [1] At the end of the site, there is a sign to indicate that the track is back to normal.
-
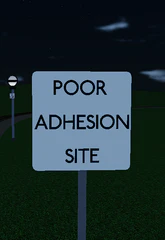 Start of site
 -
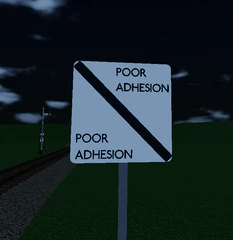 End of site


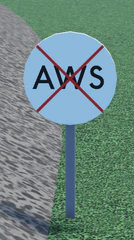
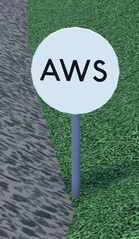
AWS Gap
The "Commencement of AWS Gap" sign indicates to drivers that AWS is not available on the following line segment, while the "Termination of AWS Gap" sign indicates that AWS is available again on the following line segment.[2]
These signs are currently only installed at the beginning of the line branching off at the Satus Services sidings.
-
 A "Commencement of AWS Gap" sign
 -
 A "Termination of AWS Gap" sign


Low clearance indicator
When you see this red and white chequered sign, this is to inform potential engineering teams that the next section has limited clearance and they will need to take extra measures to make sure they're not involved with an accident with a train. This can be found at places like between Pallion Harbour and Dovedale Central or Perthtyne where either width clearance or height clearance is low.